Add Custom Pages and Links to the Portal
Add your own pages, links, embedded tools and forms to your clients' portal sidebar, translate them, and choose which clients see each one.
Written By voiceaiwrapper
Last updated 26 days ago
You can add your own items to the sidebar of your clients' portal: a page of onboarding instructions, a link to your booking calendar, an embedded reporting tool, or an intake form. Each item can be translated into your portal's languages and shown to all clients, no clients, or only the clients and billing plans you pick.
Available on: plans that include Custom client-portal menu items. Without it, clicking Add page shows an upgrade prompt, and custom pages don't appear in your clients' portals.
Before you start
- For a Form or Form Group page: create the forms first under Client Portal → Forms. See Build Client Forms.
- For pages in other languages: turn those languages on in Portal Configuration → Localization first. See Offer the Portal in Multiple Languages.
- To show a page only on certain billing plans: the plans must exist as active Stripe billing plans. See Create a Billing Plan.
Page types
Step 1: Choose the page type
- In the sidebar, open Client Portal → Custom Pages.
- Click Add page. The Add Page sheet opens on Page type.
- Choose one of the five types and click Next.
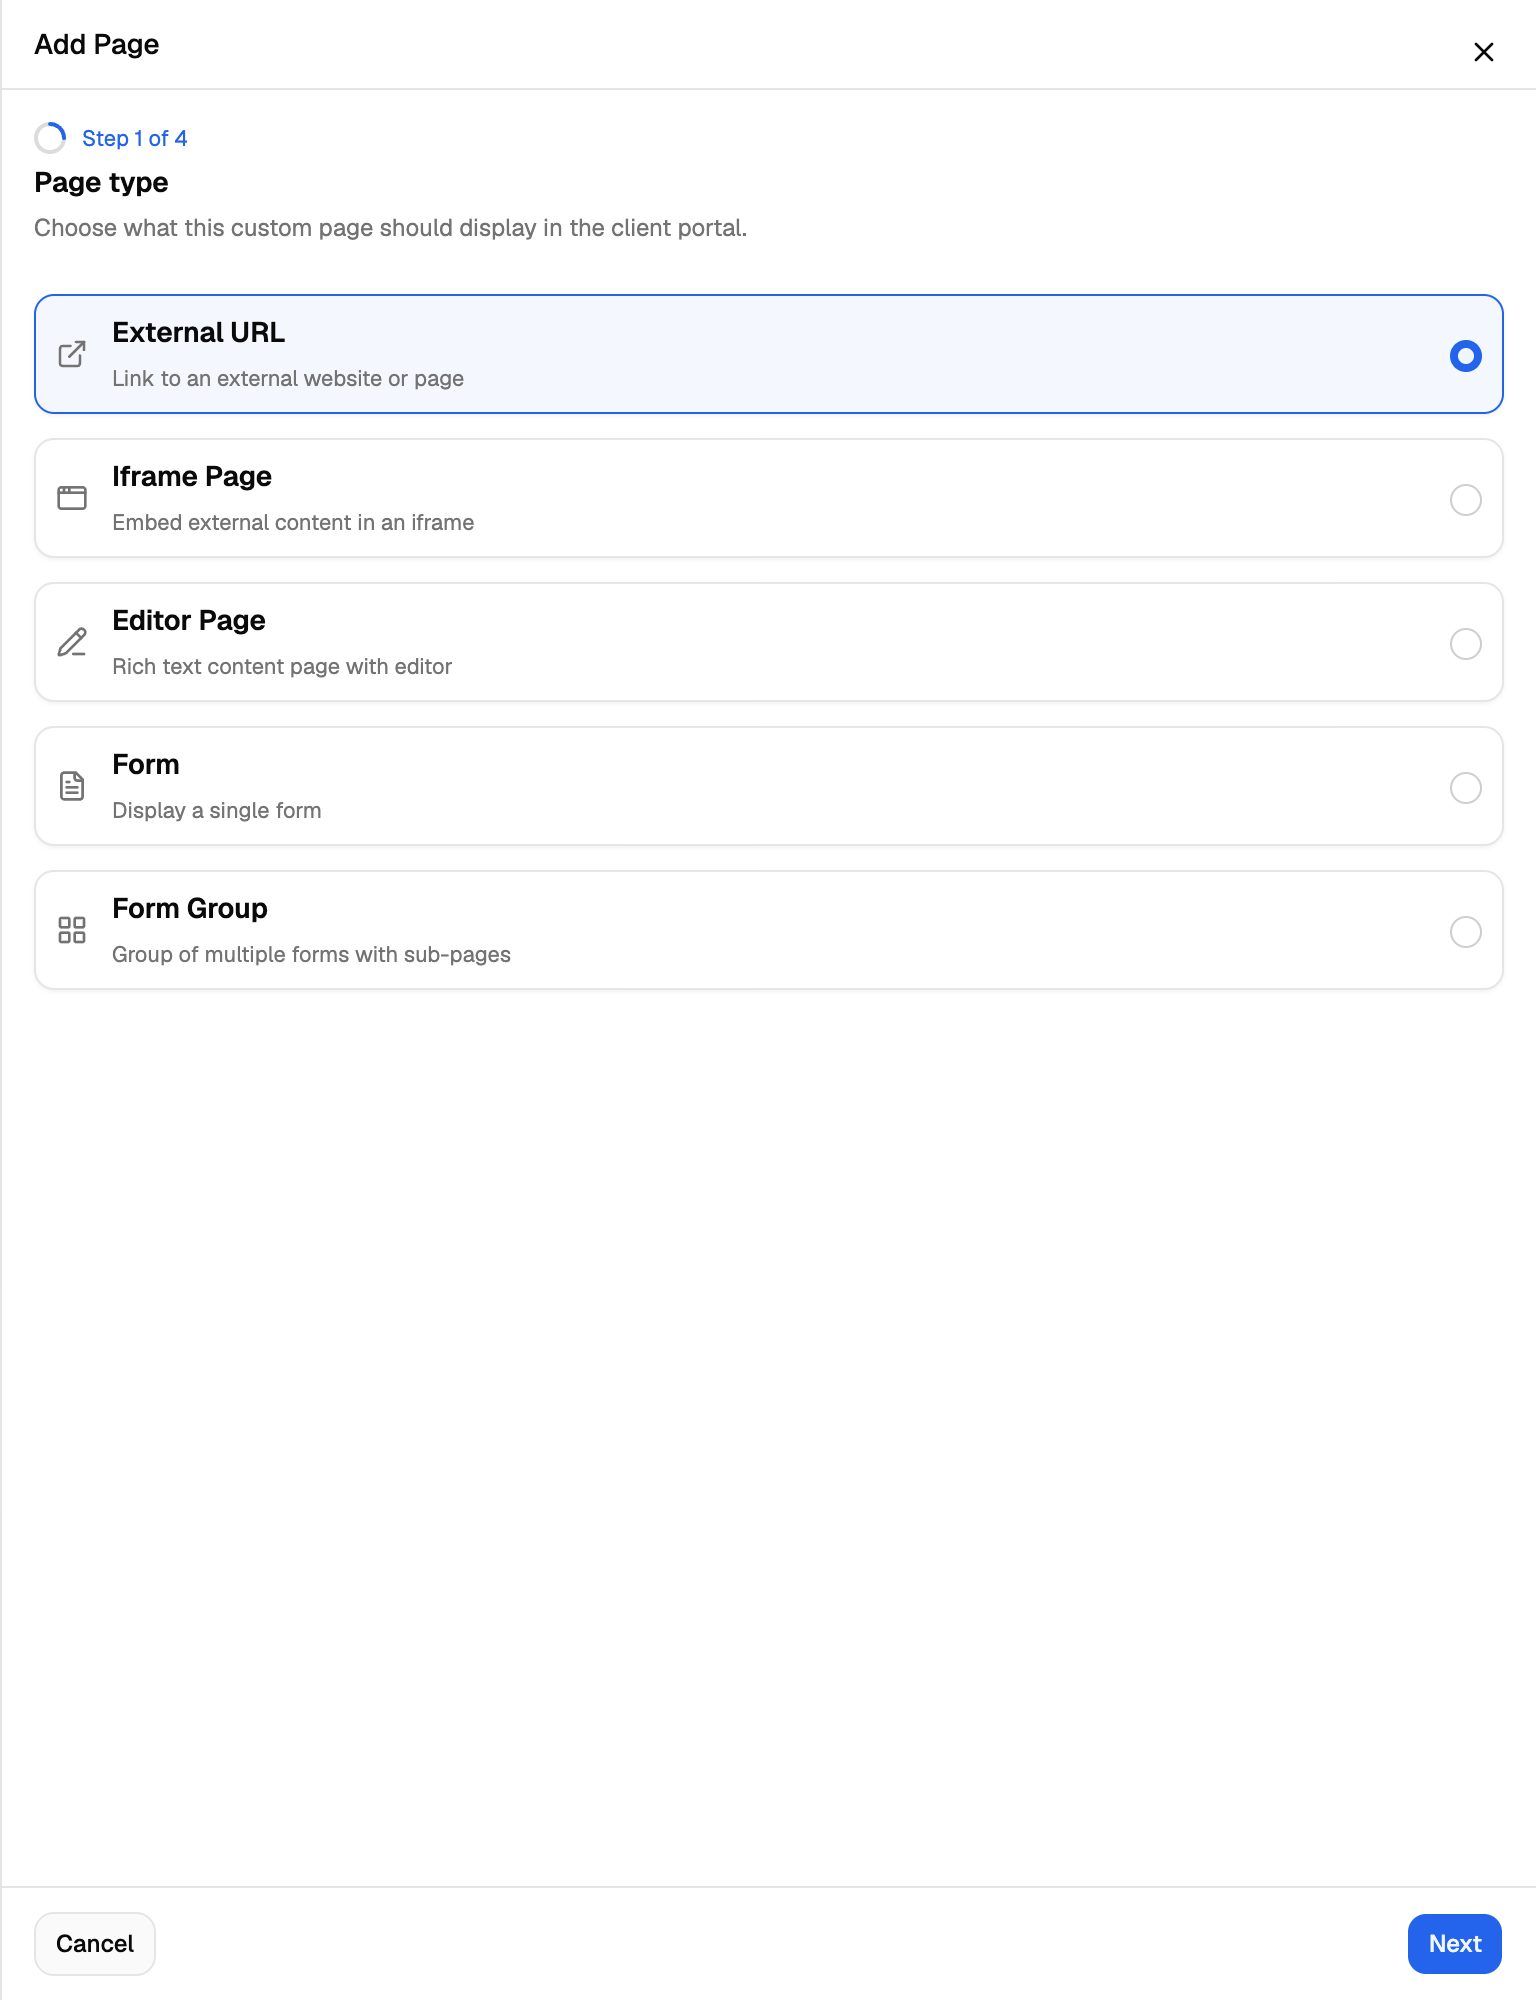
You can't change the type after the page is created. To switch, create a new page and delete the old one.
Step 2: Set the path and visibility
Page Path (every type except External URL) is the last part of the page's address in the portal. It must:
- Be at least 3 characters long.
- Use only letters, numbers, hyphens and underscores, for example
getting-started. - Be different from your other custom pages' paths.
Once your custom domain is live, the full address shows under the field, ending in /p/ followed by your path.
Sidebar Visibility decides who sees the item in their sidebar:
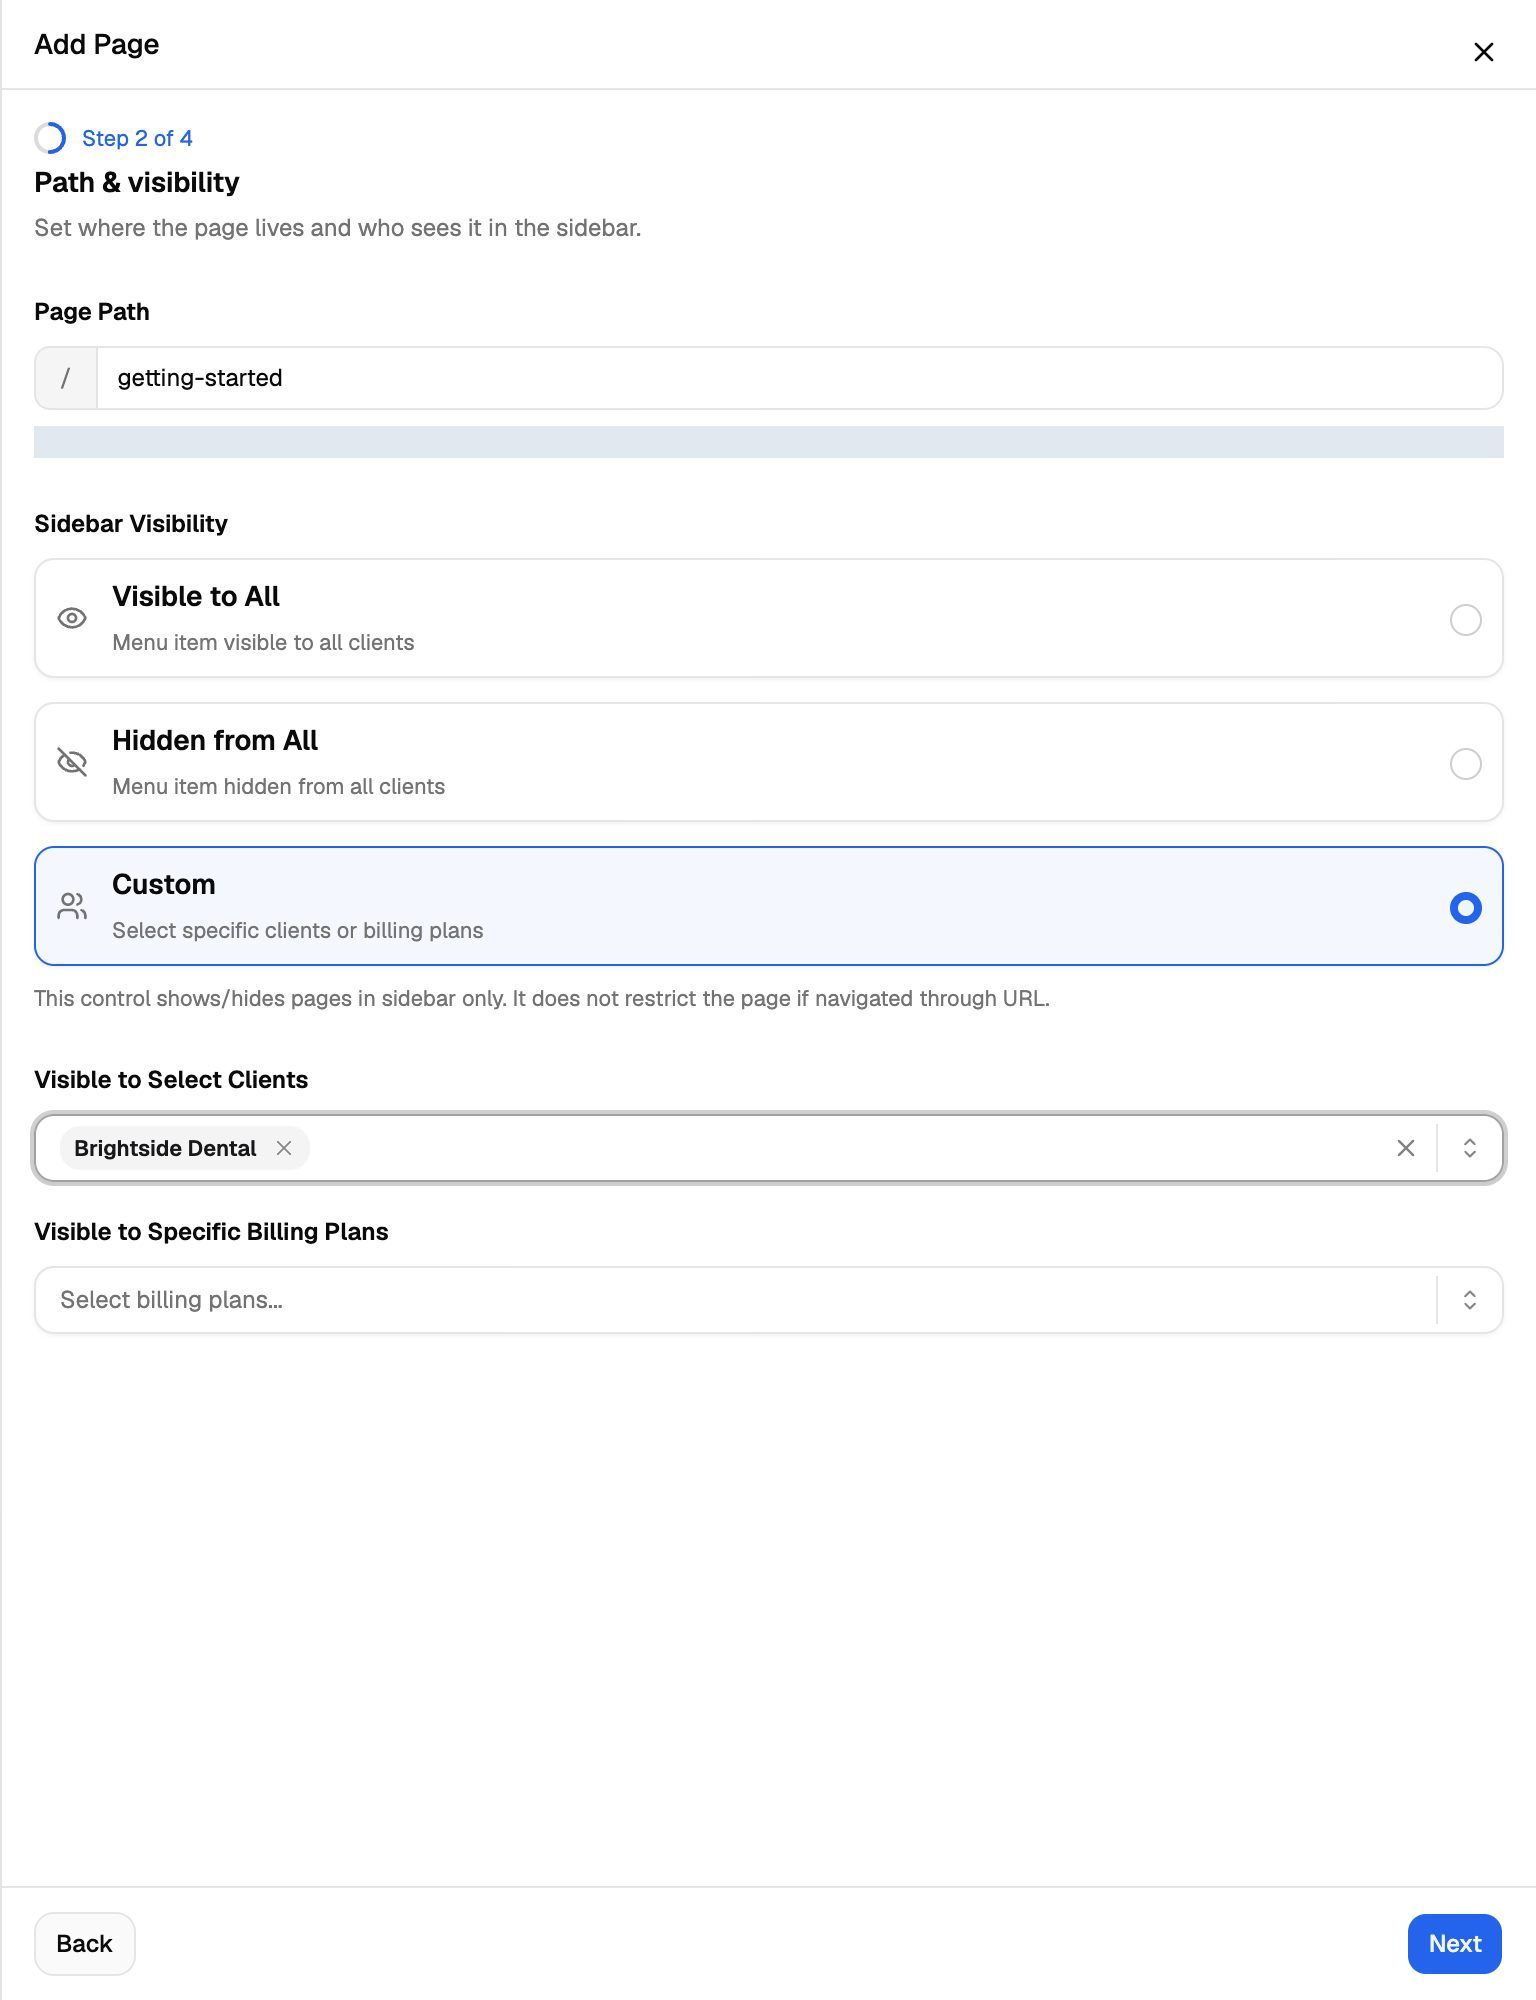
Visibility only shows or hides the sidebar item. It doesn't block the page itself: any logged-in client who has the page's address can still open it. Don't put information on a custom page that some of your clients must not see.
Step 3: Add the page content
The English version is required. For each language, fill in:
- Label (required): the text in the sidebar, up to 255 characters.
- Icon (required): the icon next to the label. Pick one from Select an icon.
- The content for your page type:
To add another language, click + Add Language and pick it. Fill in its label, icon and content the same way. Clients see the version in their portal language, or the English version if there isn't one.
If + Add Language is greyed out, either only English is turned on for your portal, or you've already added every language that is turned on. Add languages on the Localization tab first.
Personalize iframe pages
You can put client details into the iframe code so the embedded tool knows who is looking. Click Add Variable to insert one where your cursor is:
For example, src="https://reports.yourbrand.com?client={{client_id}}&theme={{app_theme}}". Type variables exactly as shown, with no spaces inside the braces, or they won't be filled in.
Personalize editor pages
In the editor, click Dynamic Variables in the toolbar (the curly-braces button), or type {{, to insert:
- Text variables: Client Name, Client Primary Email and Current User Email.
- Link variables: links to portal pages such as the dashboard, campaigns or call logs, and to your other custom pages. If a client can't access a page, that link isn't shown to them.
Step 4: Review and create
Check the summary. Each section has an edit button that takes you back to that step. Click Create.
The new item appears at the bottom of your clients' sidebar. To move it, see Reorder the Client Portal Sidebar.
Manage your pages
The All pages tab lists every custom page with its Page, Language, Type, Path and Visibility. Use the search box to find a page by name or path.
- Edit: click the edit icon in Actions to open the Edit Custom Page sheet. Everything except the page type can be changed. Click Save on the last step.
- Delete: click the delete icon, then Delete to confirm.
Deleting a custom page removes it from every client's portal sidebar. This can't be undone. Links to it from your other pages stop working, and if it's set as a page to send clients to after checkout, that redirect is cleared. Update those first.
Troubleshooting
It says "Slug must be unique."
It says "Slug must be unique."
Another custom page already uses that Page Path. Choose a different one.
A client can't see the page in their sidebar.
A client can't see the page in their sidebar.
Check the page's Visibility on the All pages tab. With Custom, the client must be selected under Visible to Select Clients, or have a Stripe subscription on a plan selected under Visible to Specific Billing Plans. Clients billed through External Billing only match by client. Then check that your plan still includes Custom client-portal menu items. To see exactly what the client sees, log in as them. See Log In as a Client to Preview Their Portal.
The client sees "Page Not Found".
The client sees "Page Not Found".
The page's path has changed, or the page was deleted. Share the current address, or recreate the page.
My iframe page is blank.
My iframe page is blank.
Check that your iframe code includes the full <iframe> tag and a src that starts with https://. Some sites block being shown inside other sites. If so, use an External URL page set to New Window instead.
Related articles
Was this helpful?
Still need help? Share an idea