Create a Billing Plan
Use the plan wizard to create a Stripe billing plan for your clients: model, details, prices per interval, trial and chat options, then edit or archive it later.
Written By voiceaiwrapper
Last updated 26 days ago
A billing plan is what you sell to a client through Stripe: a pricing model, prices for one or more billing intervals, and optional extras like a free trial. You build it once in a five-step wizard, then assign it to as many clients as you like.
Creating a plan doesn't charge anyone. Billing starts only when you assign the plan to a client and their subscription becomes active.
Available on: plans that include Stripe products & packs. Your plan sets how many active billing plans and usage packs you can have in total. At the limit, clicking Add Billing Plan shows an upgrade prompt.
Before you start
- Stripe connected. See Connect Your Stripe Account.
- Stripe Tax set up. Until the tax checks pass, Add Billing Plan stays greyed out. See Tax Settings for Client Billing.
- A pricing model in mind. You can't change it after the plan is created. See Choose a Pricing Model.
Create and change plans only in VoiceAIWrapper. The Billing Plans tab warns: "Do not edit products directly in Stripe Dashboard. Editing products in Stripe will break the sync with VoiceAIWrapper and may break client billing."
Step 1: Pick the pricing model
- In the sidebar, open Billing Configuration → Stripe.
- Open the Billing Plans tab and click Add Billing Plan. The Create a billing plan sheet opens on the Model step.
- Under Pricing Model, choose one of:
- Usage Only (per minute)
- Subscription + Overage
- Subscription + Usage Packs
- Subscription + Usage (per minute)
- Click Next.
If you pick Subscription + Usage Packs, a note reminds you that only this model unlocks SaaS Creator (self-serve signup). You set that up after the plan is created.
Step 2: Add the plan details
On the Details step, fill in:
The currency list includes USD, EUR, GBP, AUD, CAD, SEK, BRL, SGD, RUB, CHF, NOK, DKK, NZD and PLN.
If your Stripe account uses Managed Payments, pick an eligible Product tax code here. Without one, clients can't subscribe. See Tax Settings for Client Billing.
Step 3: Set prices for each billing interval
On the Pricing step (Prices & billing frequency), you add one card per billing interval:
-
Click Add interval and choose Daily, Weekly, Monthly or Yearly.
-
Fill in the prices for that interval. The fields depend on the model:
-
Repeat for any other intervals you want to offer. Each interval can be added once per plan. To remove an interval you've added but not saved yet, click the X on its card.
-
Click Next.
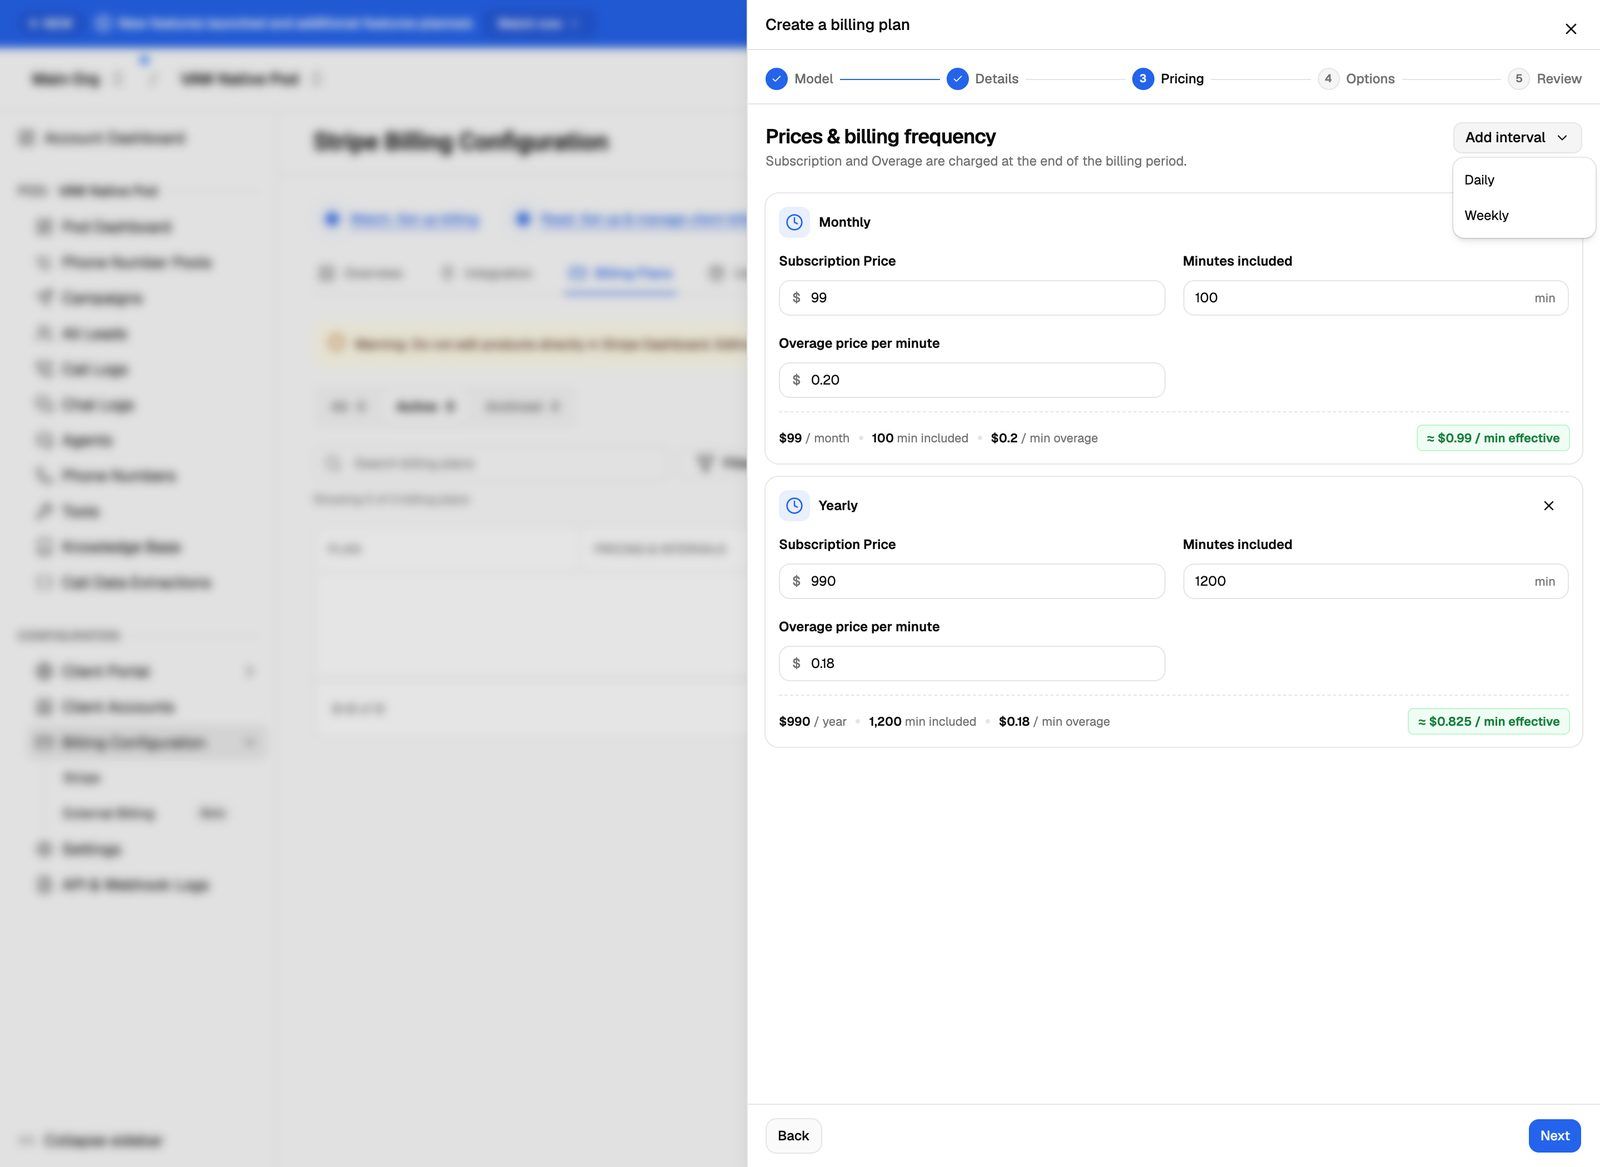
Under each card, a summary line shows what you've entered, such as the price, the minutes included and the overage rate. When a card has both a subscription price and included minutes, a badge shows the effective per-minute rate (for example, $99 with 100 minutes included shows ≈ $0.99 / min effective).
A plan needs at least one interval. If you skip this, you'll see "Add at least one billing interval." Prices can be 0 or more. On Subscription + Overage, Minutes included must be at least 1.
Minutes included don't roll over to the next billing period.
Step 4: Choose options
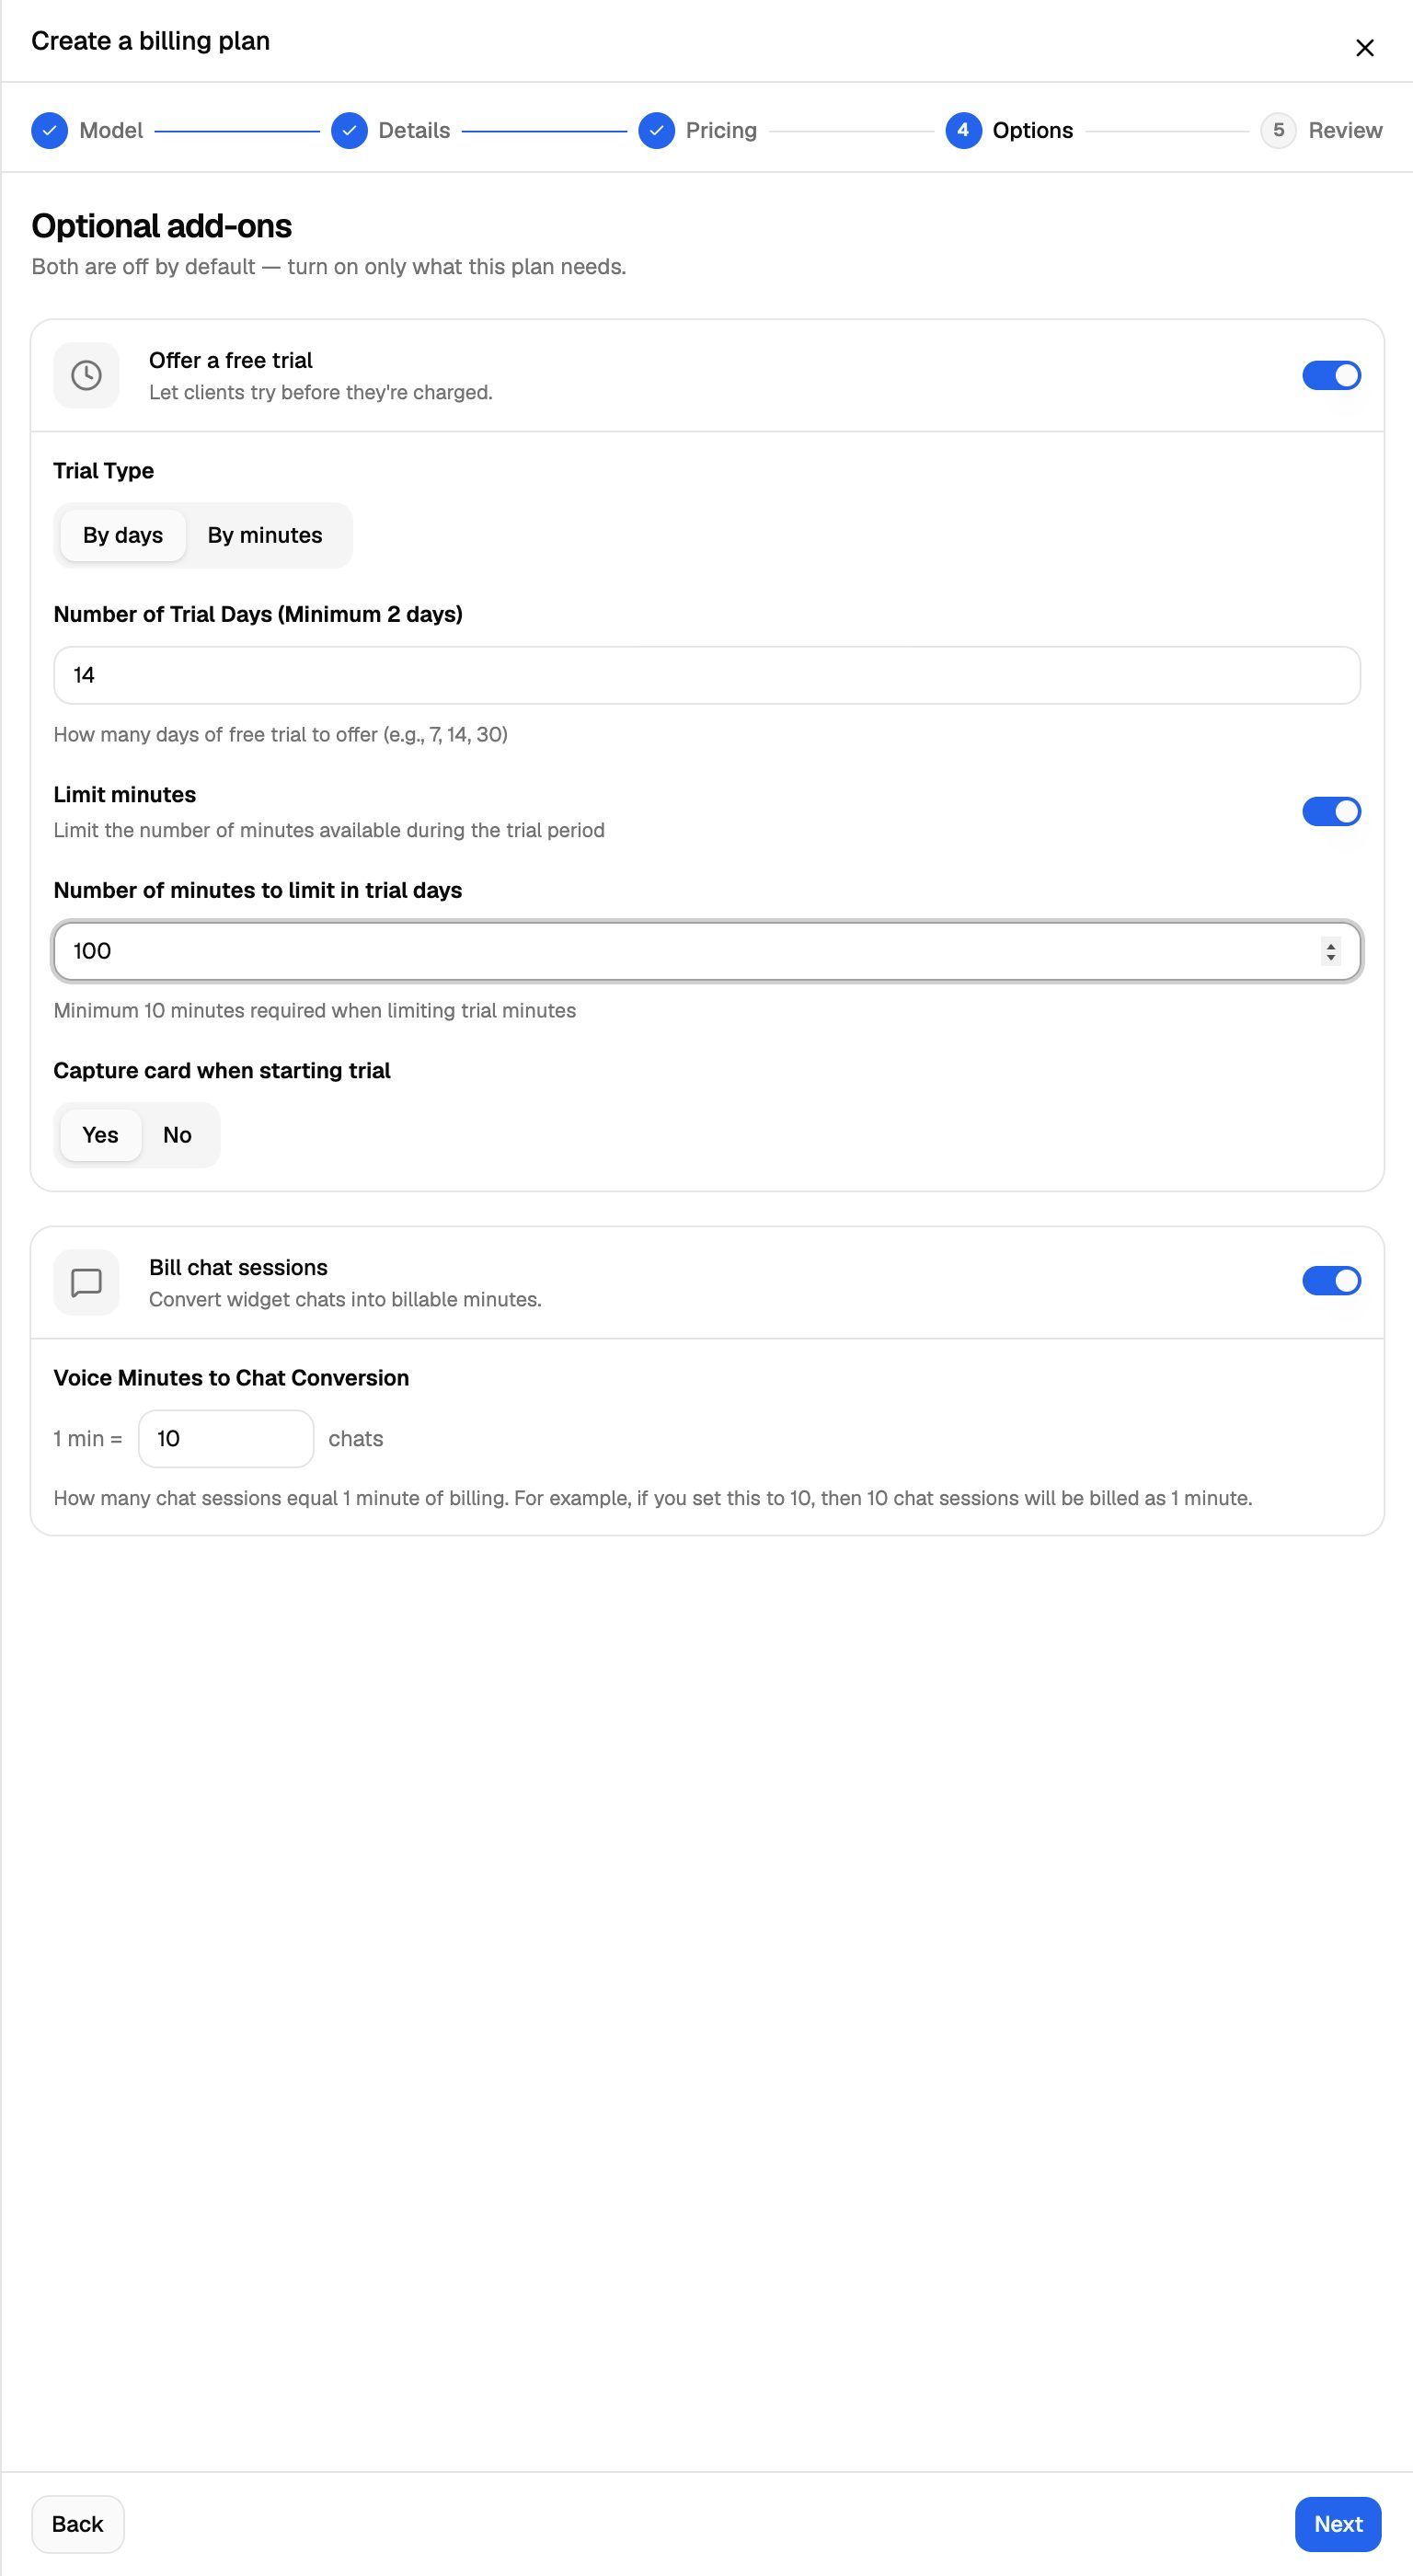
The Options step has two optional add-ons. Both are off by default.
- Offer a free trial: let clients try the plan before they're charged, by days or by minutes. See Offer Free Trials to Clients.
- Bill chat sessions: convert widget chats into billable minutes, using Voice Minutes to Chat Conversion. This option only appears if your VoiceAIWrapper plan includes Web widget. See Bill Chat Conversations.
Click Next.
Step 5: Review and create
The Review step sums up the plan: name, model, currency, each interval's prices, and whether the trial and chat billing are on. Click Edit next to any section to go back and change it.
When it looks right, click Create plan. You'll see Plan created with two next steps:
- Enable self signup: set up SaaS Creator for this plan. Only shown for Subscription + Usage Packs plans. See Set Up a Plan for Self-Serve Signup.
- Enable this manually: go to Client Accounts to assign the plan to a client. See Assign a Plan and Manage a Client's Subscription.
Click Back to plans to return to the list. The new plan appears on the Billing Plans tab with its prices, number of active subscriptions (Active Subs) and SaaS Creator status.
Edit a plan
- On the Billing Plans tab, click the pencil icon (Edit Product) on the plan's row.
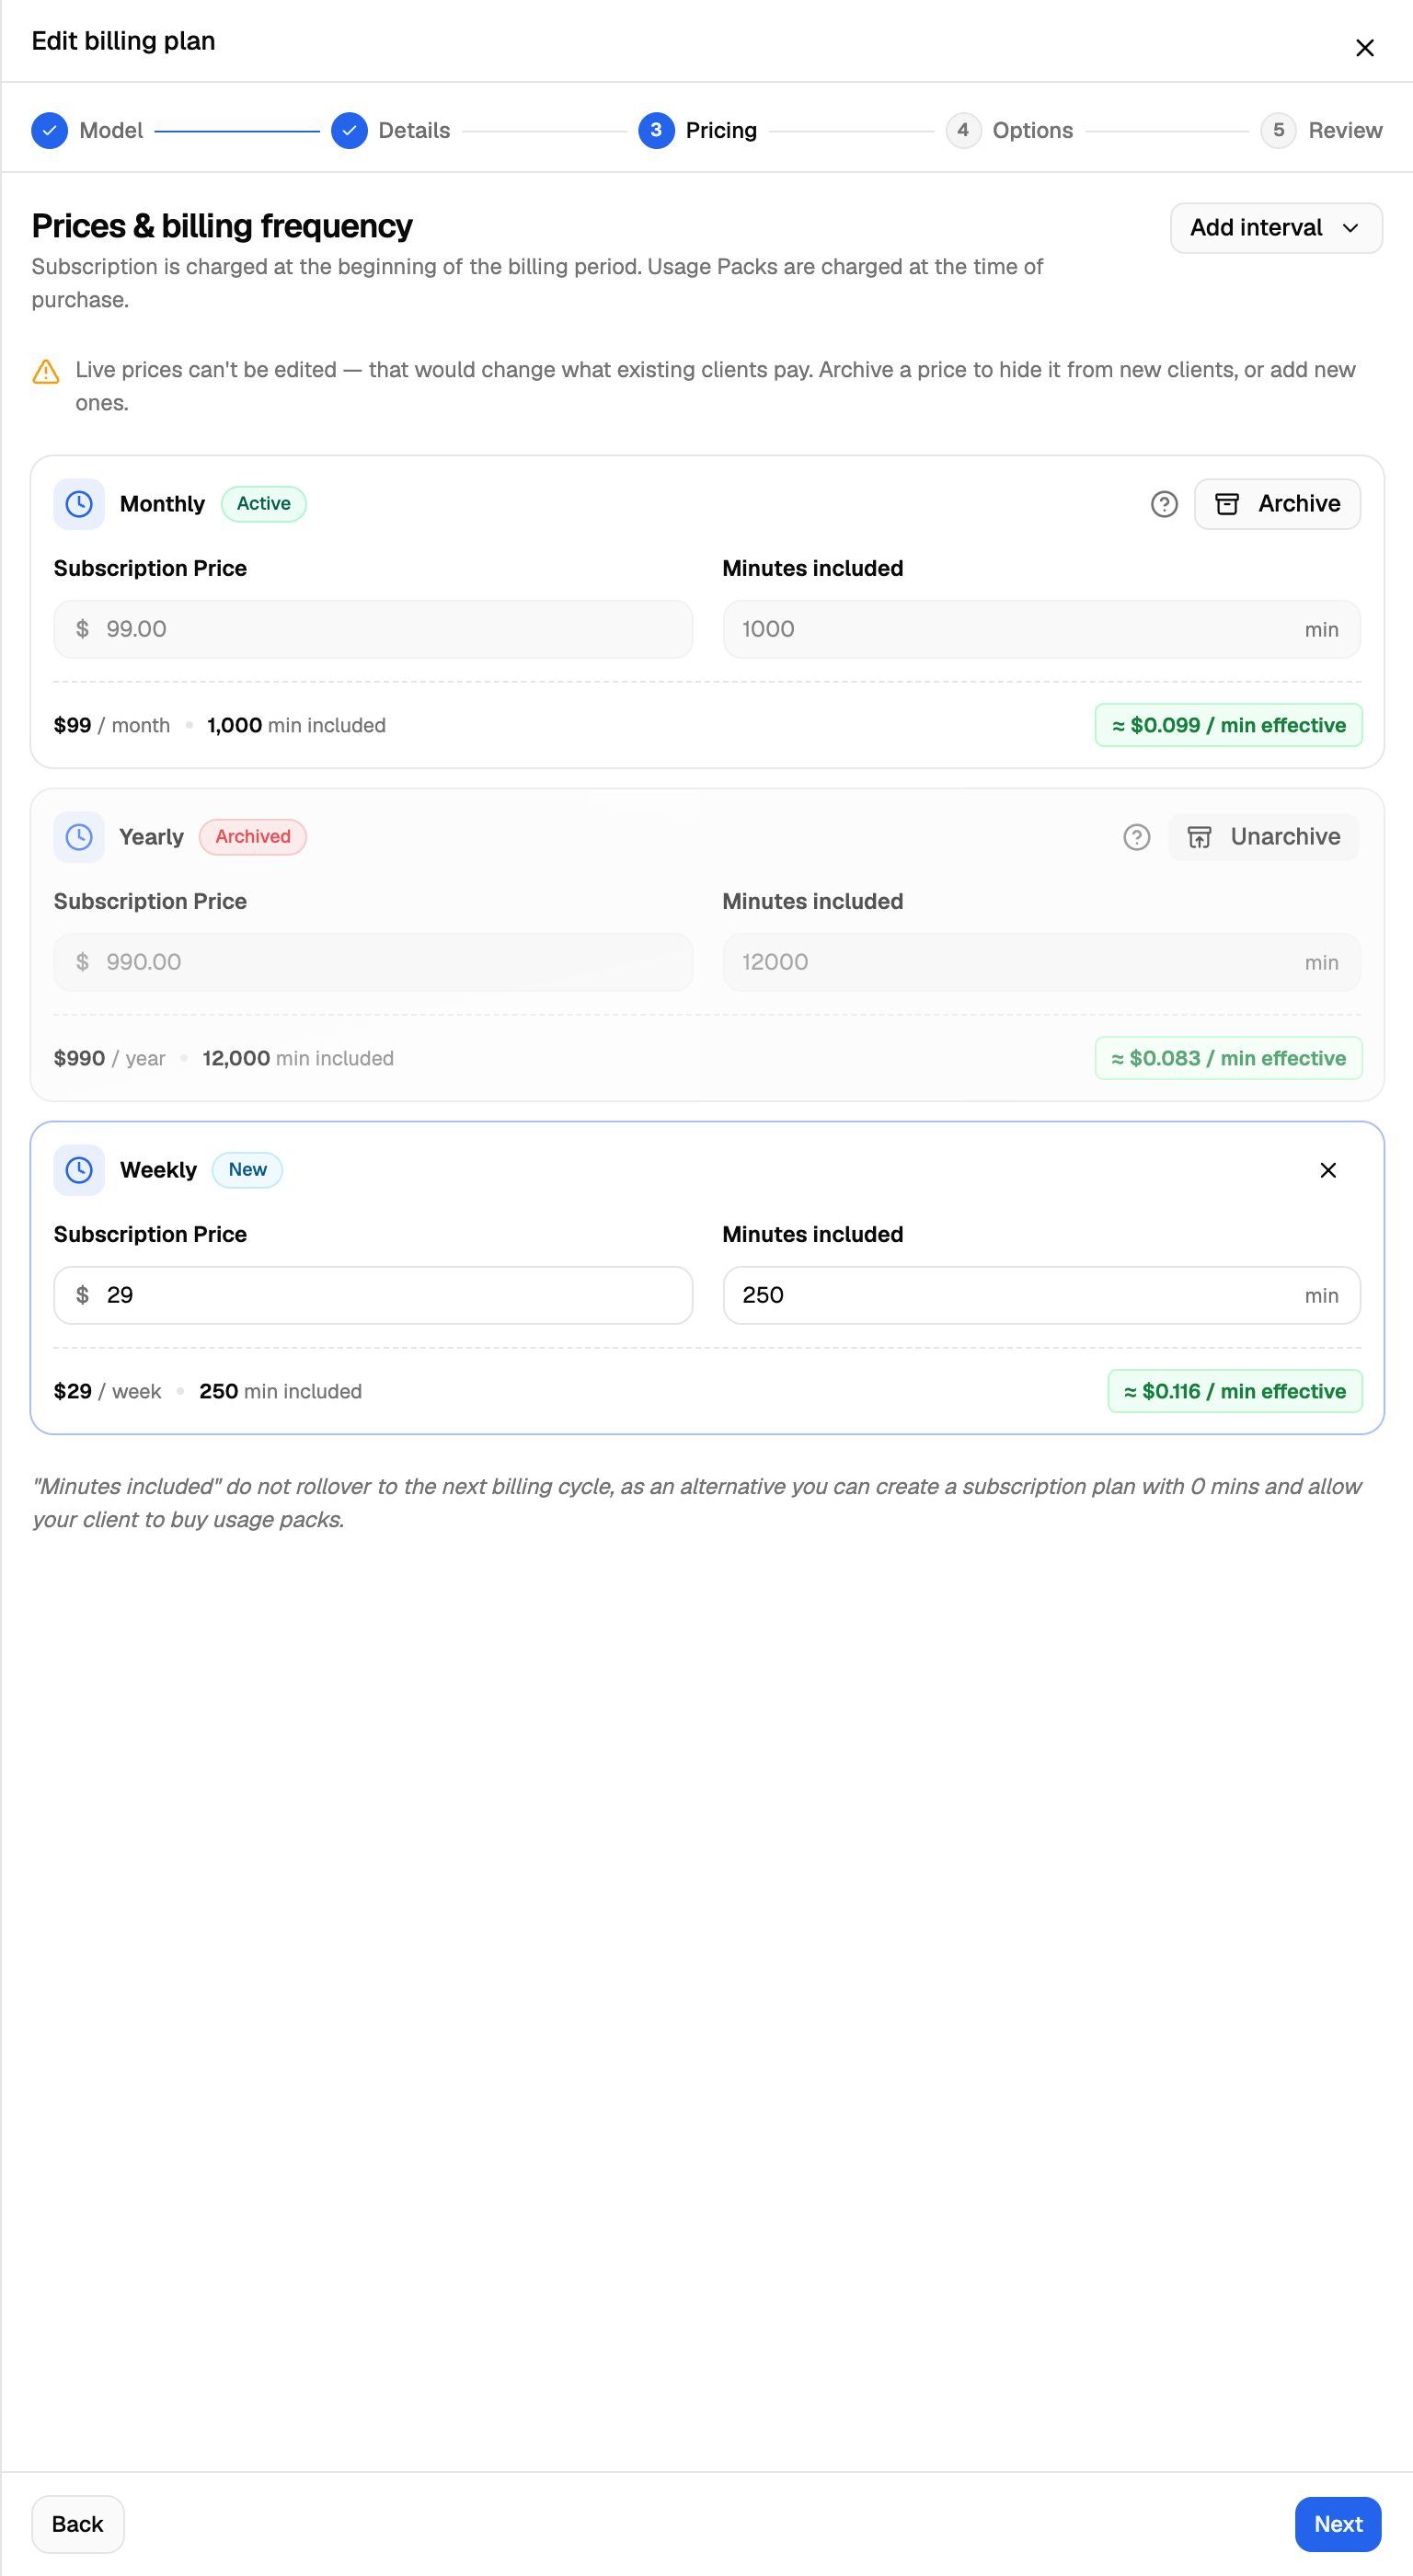
- The Edit billing plan sheet opens on the Pricing step. Click Back to reach the details, or Next for the options.
- Make your changes, then click Update plan on the Review step.
What you can and can't change:
Live prices are locked because changing them would change what existing clients pay. In edit mode each interval card shows a status badge: Active, Archived or New.
Each interval appears only once on a plan, and an archived interval still counts. So to charge a new price for an interval the plan already has (for example a new Monthly price), create a new plan with that price, then archive the old plan or its old interval.
Changes apply to new clients. Existing subscriptions keep their current pricing. Trial setting changes also apply only to new customers.
Archive or unarchive an interval's price
On the Pricing step of the edit sheet, click Archive on an interval card. Archiving makes that price unavailable for new clients to buy. Existing clients keep being charged at that rate. Click Unarchive to offer it again.
Archive or unarchive a whole plan
Archive a plan you no longer want to offer to new clients.
- On the Billing Plans tab, click the archive icon (Archive Product) on the plan's row.
- Confirm with Archive.
Archived plans move to the Archived filter at the top of the list. They can't be assigned to new clients, and they don't count toward your plan's limit for Stripe products & packs. To offer the plan again, open the Archived filter, click the unarchive icon (Unarchive Product), and confirm with Unarchive. If you're at your limit, unarchiving shows an upgrade prompt.
Troubleshooting
"Add Billing Plan" is greyed out.
"Add Billing Plan" is greyed out.
Either Stripe isn't connected or your Stripe tax settings aren't complete. The page shows Stripe Not Connected or Tax Settings Not Configured with what to do. See Connect Your Stripe Account and Tax Settings for Client Billing.
Clicking "Add Billing Plan" opens an upgrade prompt.
Clicking "Add Billing Plan" opens an upgrade prompt.
You've reached the number of active billing plans and usage packs your plan allows. Archive a plan or usage pack you no longer use, or upgrade. See A Feature Is Locked or Asks Me to Upgrade.
The "Add interval" menu is greyed out.
The "Add interval" menu is greyed out.
I don't see "Bill chat sessions" on the Options step.
I don't see "Bill chat sessions" on the Options step.
Chat billing only appears when your VoiceAIWrapper plan includes Web widget.
I created a plan but nothing is being charged.
I created a plan but nothing is being charged.
That's expected. A plan only bills once you assign it to a client in Client Accounts → (a client) → Billing, and their subscription is active. Calls are billed only for campaigns assigned to that client.
Related articles
Was this helpful?
Still need help? Share an idea