Build Client Forms
Collect onboarding details and requests from clients with forms inside their portal, and send each submission to your own webhook.
Written By voiceaiwrapper
Last updated 26 days ago
Client forms let you collect information from your clients inside their portal: onboarding details, Twilio or Cal.com credentials, change requests, anything you'd otherwise chase by email. You build the form once, add it to the portal as a page, and every answer is saved for you. You can also have each submission sent to your own webhook, so a tool like Make, n8n or Zapier can act on it.
Available on: plans that include Client forms. Your plan may also limit how many forms you can have. Without the feature, or once you reach the limit, clicking Create Form or Templates shows an upgrade prompt.
Before you start
- Decide what you want to collect and whether clients should fill the form in once or many times (see Step 1).
- If you want submissions sent somewhere automatically, have a webhook URL ready (for example from Make, n8n or Zapier).
- Forms reach clients through a custom page, so your plan also needs to include Custom client-portal menu items. See Add Custom Pages and Links to the Portal.
Step 1: Create the form
- In the sidebar, open Client Portal → Forms.
- Click Create Form.
- Enter a Title and, if you like, a Description (Optional).
- Choose a Form Type:
- Click Create Form. The form appears in the list.
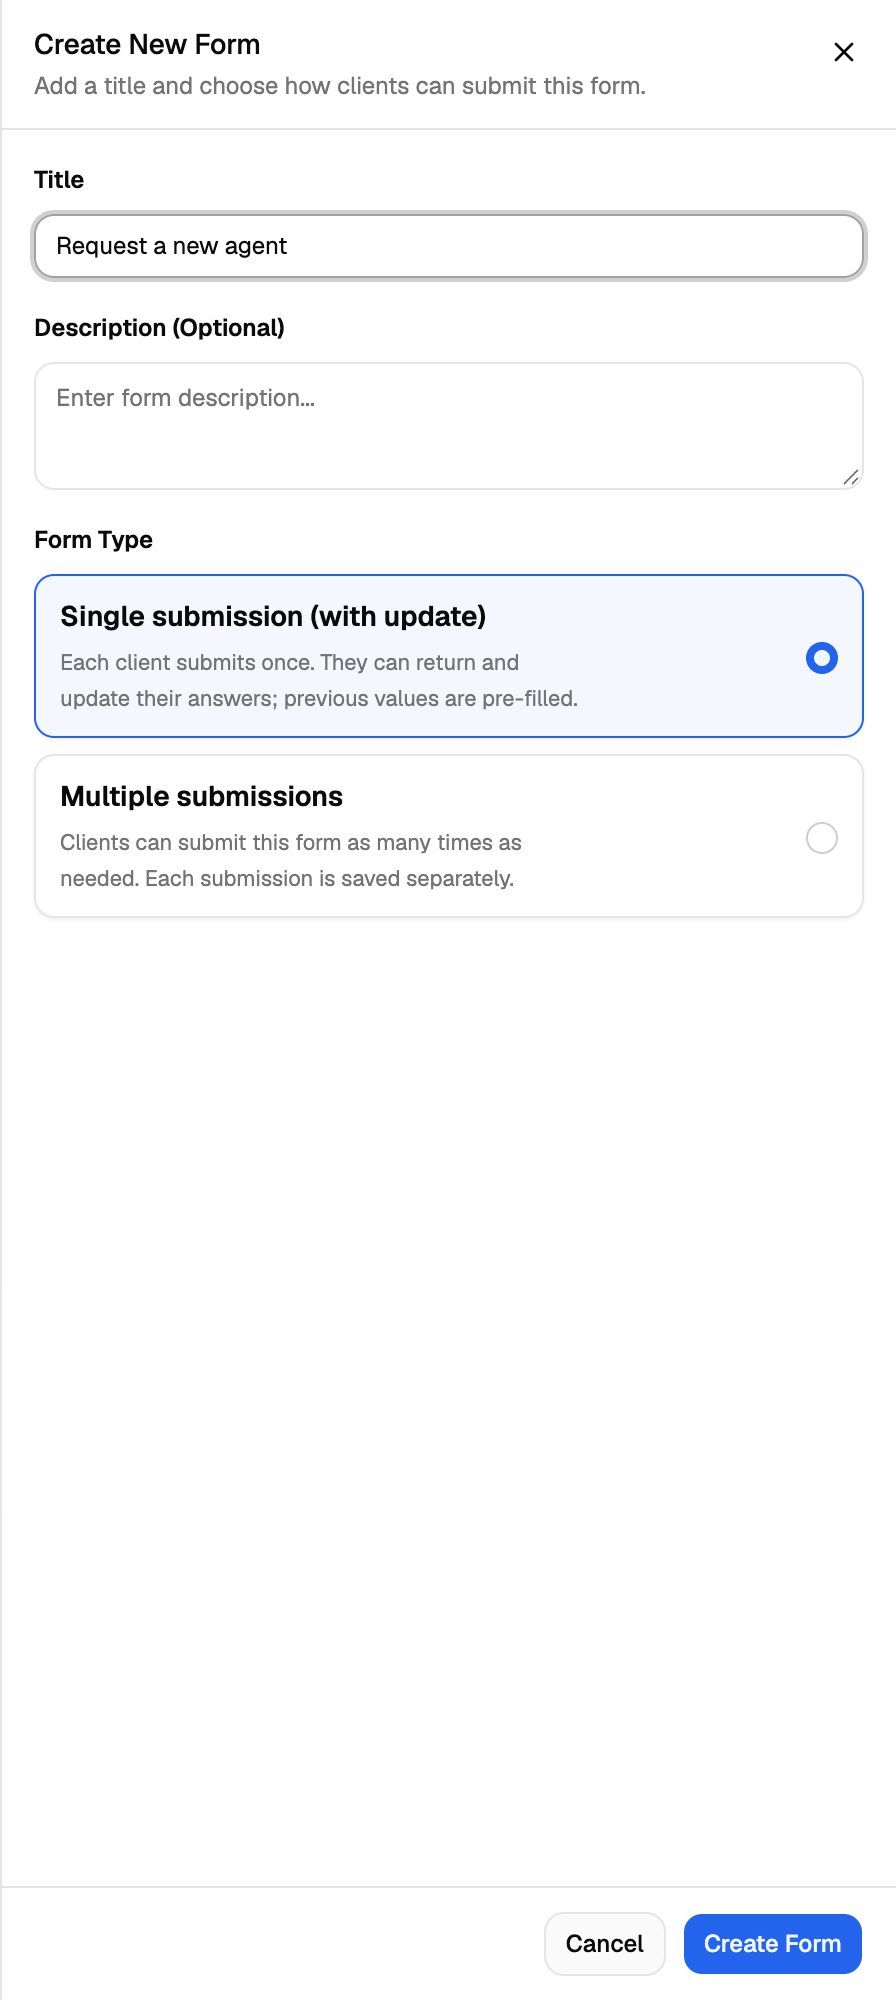
You can't change the form type after the form is created. If you picked the wrong one, create a new form.
Start from a template instead
Click Templates to see ready-made forms. Pick one on the left to preview it, then click Use template. The form is created and opens straight away so you can adjust it. The templates are:
- Client Onboarding Form
- Setup Twilio Number
- Cal.com Integration Form
All three use Single submission (with update).
Client Onboarding Form and Setup Twilio Number are set to Redirect to Custom Page, but no page is chosen yet. After you create one of them, open Success Behavior and pick a page, or switch it to Show Success Screen.
Step 2: Build the form
Click a form in the list to open it. The page has three tabs: Edit, Preview and Submissions. Under the title you'll see the form type, whether a webhook is set, and how many client submissions it has.
On the Edit tab, the Form Builder has these sections:
- Banner: an image across the top of the form. Paste an image URL or upload one.
- Title and Description: what clients see above the fields.
- Form Fields: the questions themselves.
- Buttons Configuration: the submit button and any extra buttons.
- Success Behavior: what happens after a client submits.
Add and arrange fields
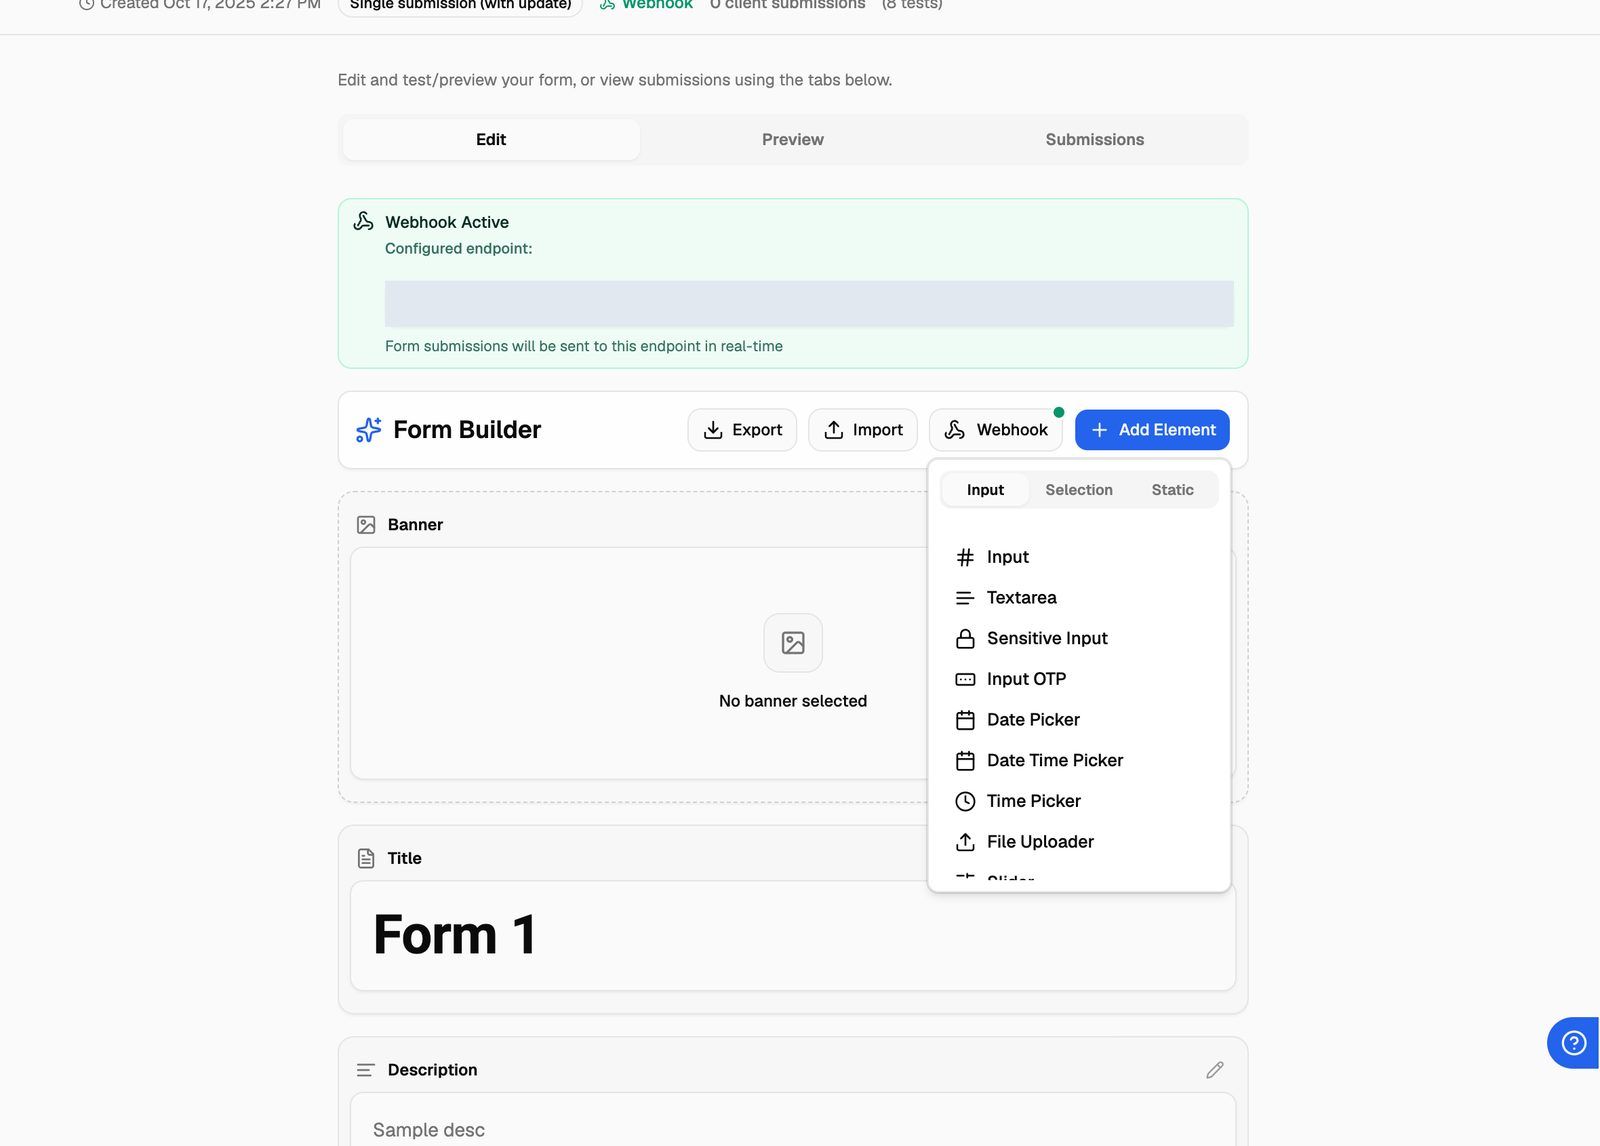
- Click Add Element. The menu has three tabs:
- Input: Input, Textarea, Sensitive Input, Input OTP, Date Picker, Date Time Picker, Time Picker, File Uploader, Slider, List, Phone Input, Rich text.
- Selection: Checkbox, Radio, Select, Multi select, Switch, Toggle.
- Static (text and layout, not questions): Heading 1, Heading 2, Heading 3, Paragraph, Separator, Copy To Clipboard, Image.
- Click an element to add it to the end of the form.
- Drag a field by its handle to move it. Use the icons on each field to edit, duplicate or delete it.
Set up each field
Click the edit icon on a field to open Customize form field attributes. Depending on the field type you can set:
- Field ID: the name the answer is stored under. Letters, numbers and underscores only, and each field needs its own. If you send submissions to a webhook, this is the key your automation reads, so give it a clear name like
business_name. - Field Label, Field Description and Field Placeholder.
- Options for Select, Radio and similar fields, with Preselect Option.
- Limits such as Min length / Max length, Min value / Max value, and for file uploads Allowed Files and Max File Size (in MB) (1 to 5 MB).
- Make field required and Disable field.
Buttons and what happens after submit
- Click the edit icon on Buttons Configuration to change the Submit Button label, turn on a Submit Loader, set the Button Alignment, or add Additional Buttons that open a URL, download a file or copy text.
- Click the edit icon on Success Behavior and choose a Behavior Type:
- Show Success Screen: a confirmation message with your own Title, Description and Button Text.
- Redirect to Custom Page: send the client to one of your custom portal pages. External URL pages aren't offered. If the list is empty, create a custom page first.
Save your changes
Click Save at the bottom of the Edit tab. Nothing you change in the builder is kept until you save. The button stays greyed out until there's something to save.
Export downloads the form as a JSON file, and Import loads one. Use them to copy a form you like into a new one.
Step 3: Send submissions to a webhook (optional)
- On the Edit tab, click Webhook. The dot on the button is red when no webhook is set and green when one is.
- Enter your Webhook URL and click Save Webhook. Leave the field empty to turn the webhook off.
Save Webhook saves the URL straight away, separately from the builder's Save button. Save your builder changes before you set the webhook.
When a webhook is set, the tab shows Webhook Active with the endpoint. Each submission is sent as a POST request with a JSON body like this:
{
  "form_id": "Q2xpZW50Rm9ybVR5cGU6MTI=",
  "is_test": false,
  "submission_type": "new",
  "form_data": { "business_name": "Acme Dental" },
  "client": {
    "id": "Q2xpZW50VHlwZTo0NQ==",
    "name": "Acme Dental",
    "primary_email": "owner@acmedental.com",
    "client_type": "...",
    "enabled": true
  },
  "metadata": { "client_configuration_id": "..." }
}
form_dataholds the answers, keyed by each field's Field ID.submission_typeisnewfor a first submission andupdatewhen a client changes a Single submission (with update) form.is_testistruefor submissions you make from the Preview tab. Test submissions have noclient, and theirsubmission_typeis empty (null).
A delivery counts as successful when your endpoint answers with a status code below 400 within 30 seconds. If it fails, the webhook is retried up to 3 more times, with a longer wait each time (a few minutes in total).
Step 4: Test the form
Open the Preview tab. Card Preview shows how the form looks in a list of forms, and Full Form Preview shows the form as clients will fill it in.
Fill in the preview and submit it. This saves a real test submission, marked Test, and sends it to your webhook if one is set. On a Single submission (with update) form, each new test replaces your previous test submission.
Step 5: Add the form to the portal
Clients don't see a form until you put it on a custom page:
- Open Client Portal → Custom Pages and click Add page.
- Choose Form to show one form, or Form Group to show several forms, each on its own sub-page.
- Select your form, set the page path and choose who can see it in the sidebar.
Full steps are in Add Custom Pages and Links to the Portal.
Step 6: Review submissions
Open the form and go to the Submissions tab. Pick a submission from Select a submission to view. Client submissions show the client's name and email; test submissions show Test Submission and the date.
Each submission shows:
- Submission Overview: ID, time, and the client's name and email.
- Form Response: the answers.
- Webhook Delivery: Delivered, Failed or Pending, with the number of attempts, the URL, the request body and your endpoint's response.
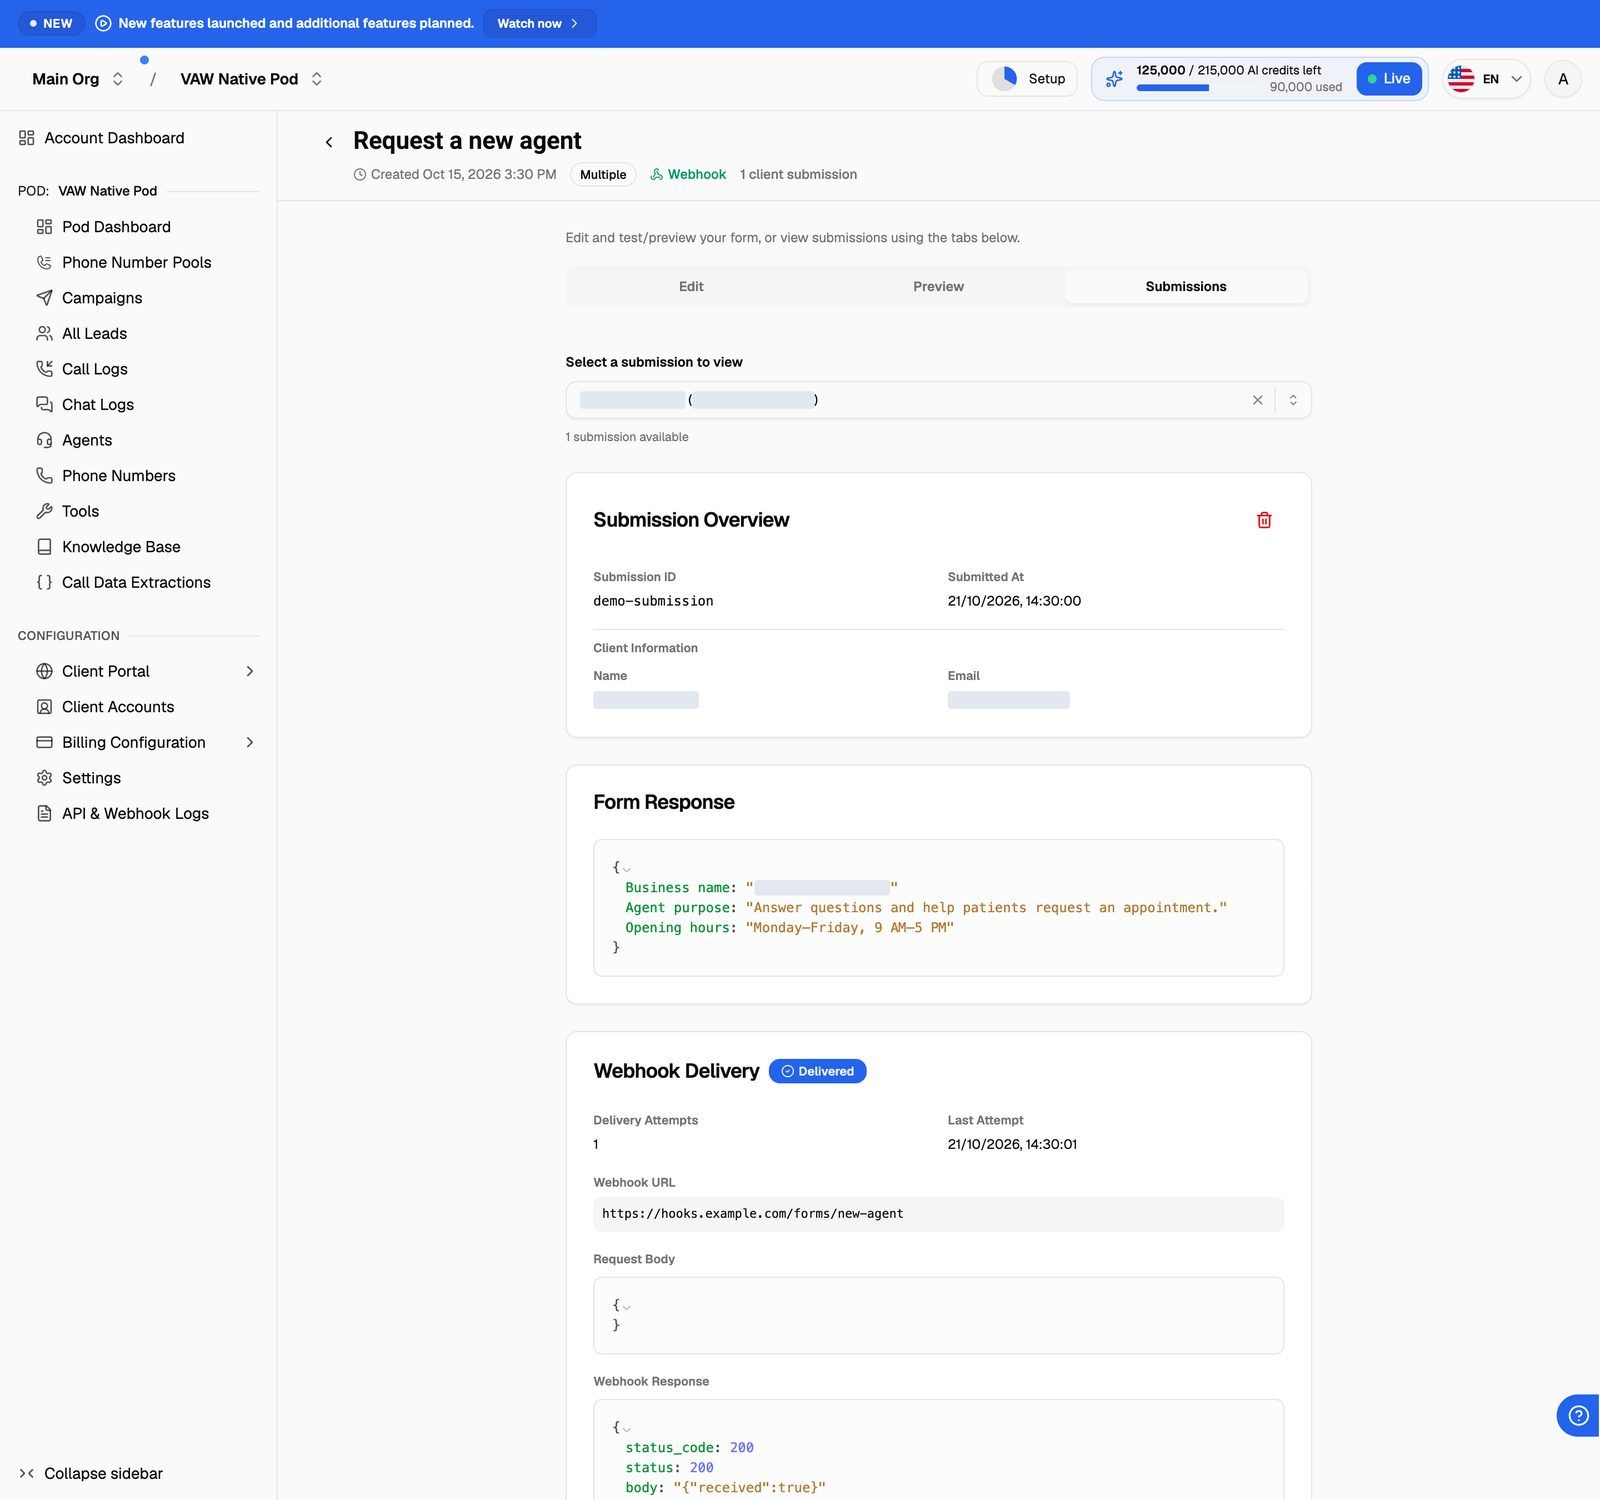
To remove a submission, click the delete icon next to Submission Overview.
Deleting a submission can't be undone. Deleting a form (the delete icon in the Actions column of the forms list) also deletes all of its submissions and removes the form from every custom page that shows it, which can leave those pages without content. This can't be undone either. Before you delete a form, change or remove the custom pages that use it.
Frequently asked questions
Clicking Create Form shows an upgrade prompt.
Clicking Create Form shows an upgrade prompt.
Either your plan doesn't include Client forms, or you've reached the number of forms your plan allows. Delete a form you no longer need, or upgrade. See A Feature Is Locked or Asks Me to Upgrade.
My client can't find the form in their portal.
My client can't find the form in their portal.
Check that the form is on a custom page (Form or Form Group) and that the page's sidebar visibility includes this client. Forms aren't shown anywhere else in the portal.
The webhook shows Failed.
The webhook shows Failed.
Open the submission on the Submissions tab and look at Webhook Response. It shows the status code or error your endpoint returned. Fix the endpoint, then submit a test from the Preview tab to check it.
Failed appears as soon as one attempt fails. If a later retry gets through, the badge changes to Delivered. A failed submission isn't sent again after the last retry.
The webhook shows Pending.
The webhook shows Pending.
Pending means nothing has been sent yet. A submission stays Pending if the form had no webhook when it was submitted. Setting a webhook later doesn't send older submissions.
What are Automation Forms in SaaS Creator?
What are Automation Forms in SaaS Creator?
They're the same client forms, created from Billing Configuration → Stripe → SaaS Creator → Automation Forms. There, a webhook URL is required when you create the form, because the form is meant to trigger your automations. See Automation Forms for Self-Serve Clients.
Related articles
Was this helpful?
Still need help? Share an idea