Invoices, Payment Methods and Tax Details
Download invoices, update the card you pay with, and change your billing address and tax ID from the Billing section of Settings.
Written By voiceaiwrapper
Last updated 26 days ago
Your invoices, the card you pay with and your billing details all live in the Billing section of Settings. VoiceAIWrapper uses Stripe to take payments, so most changes open a secure Stripe page and then bring you back to the webapp.
Only Owners and Admins can open Settings. Other team members see Access Restricted.
Before you start
- You need the Owner or Admin role in the organization.
- Your organization needs a plan. Without one, the Billing section shows the plan picker instead. See Choose a Plan and Add a Payment Method.
Open the Billing section
Use either of these:
- In the sidebar, click Settings and scroll to Billing.
- Click your organization's name at the top left of the header, then click the card icon (Payment). It takes you straight to Billing.
On most plans, the right-hand card holds your billing records. It has these parts:
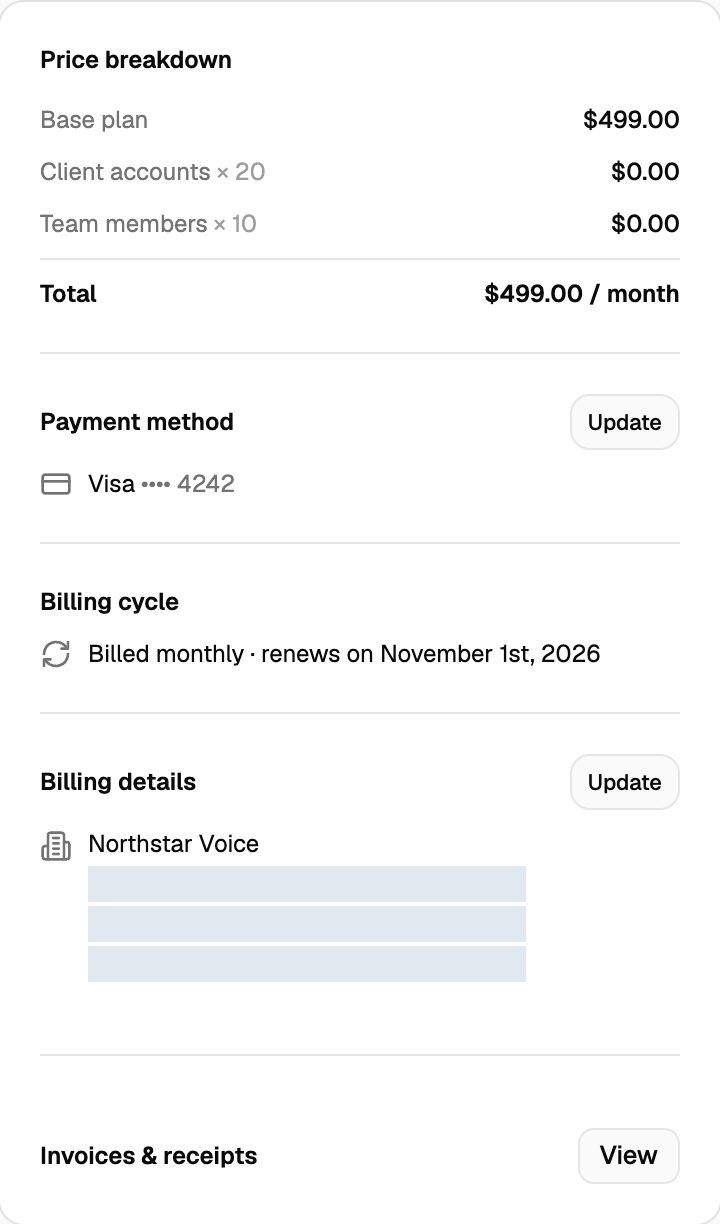
Some older plans show three tiles instead: Manage subscription, Payment method and Invoices & receipts. They open the same Stripe pages described below.
View and download invoices
- In Billing, find Invoices & receipts. Depending on your plan, it's a View button at the bottom of the right-hand card, a button at the top of your plan card, or a tile.
- Click it. Stripe's billing portal opens with your billing history.
- Open any invoice to view or download it.
- Use the portal's return link to come back to the webapp.
Update your card
- In Billing, find Payment method.
- Click Update (or Add card if no card is saved). On older plans, click the Payment method tile.
- Stripe opens straight to the add or update card page. Enter the new card and save it.
- You return to the webapp, and the new card shows under Payment method.
Your next bill, and any payment retry, uses the new card. If a payment has already failed, see Failed Payments.
On a free trial that started without a card, you may see Activate followed by your plan's name instead of the card and billing details buttons. It takes you to checkout, where you add your card and billing details. See Free Trials Explained.
Update your billing details and tax ID
Your billing address is collected when you add your card. To change your details later:
- In Billing, click Update next to Billing details. On older plans, click Manage subscription ("Update billing details & tax info in the Stripe portal").
- In the Stripe billing portal, edit your details and save.
- Return to the webapp. Your details show under Billing details, with your tax ID as Tax ID: followed by its type and number.
About tax IDs:
- A tax ID is always optional. Adding one doesn't change the amount you're charged.
- The tax ID field is offered on some billing accounts only. If you don't see it in checkout or the portal, your account doesn't collect one.
Credit purchases
AI credits you buy are charged separately from your plan, through their own Stripe checkout. After each purchase, the person who created the organization and every Owner get an email confirming the credits added and the amount paid. See Buy Credits and Set Up Auto Top-Up.
Frequently asked questions
I can't see the Billing section.
I can't see the Billing section.
Only Owners and Admins can open Settings. If you see Access Restricted, ask your organization's Owner to change your role or to handle billing. See Invite Team Members and Assign Roles.
The Billing section shows plans instead of my invoices.
The Billing section shows plans instead of my invoices.
That means your organization has no active plan, for example after a cancellation took effect. Choose a plan to get back in. See Choose a Plan and Add a Payment Method.
My Price breakdown doesn't show a Tax line.
My Price breakdown doesn't show a Tax line.
The Tax line appears only when your bill includes tax. If there's no line, no tax is being added to your bill.
I belong to several organizations. Which invoices am I looking at?
I belong to several organizations. Which invoices am I looking at?
Each organization has its own plan, card and invoices. Billing always shows the organization you're currently in. Switch organizations first to see another one's records. See Join, Create and Switch Organizations.
Related articles
Was this helpful?
Still need help? Share an idea