Assign a Campaign to a Client
Link a campaign to a client's workspace from the campaign's Client tab so its calls are billed to that client, and fix 'Wrong config' when several clients are linked.
Written By voiceaiwrapper
Last updated 26 days ago
Assigning a campaign to a client tells VoiceAIWrapper whose campaign it is. From that moment, the campaign's calls and chats are billed to that client, and the client can see the campaign in their portal according to their workspace permissions. A campaign that isn't assigned to anyone isn't billed to anyone.
You assign a campaign to one client and one of that client's workspaces. In the webapp, a workspace is labelled Account configuration.
Before you start
- A client account with at least one workspace on the same Pod (an engine or provider connection) as the campaign. See Add a Client Account and Create a Workspace and Assign Assets.
- Billing set up for the client if you want the calls charged. Assigning the campaign decides who is billed; the client's plan decides how. See Ways to Bill Your Clients: Stripe or External Billing.
Assign the campaign
- In your Pod, open Campaigns and click the campaign.
- Open the Client tab. Its badge shows Not assigned.
- Click Assign to client.
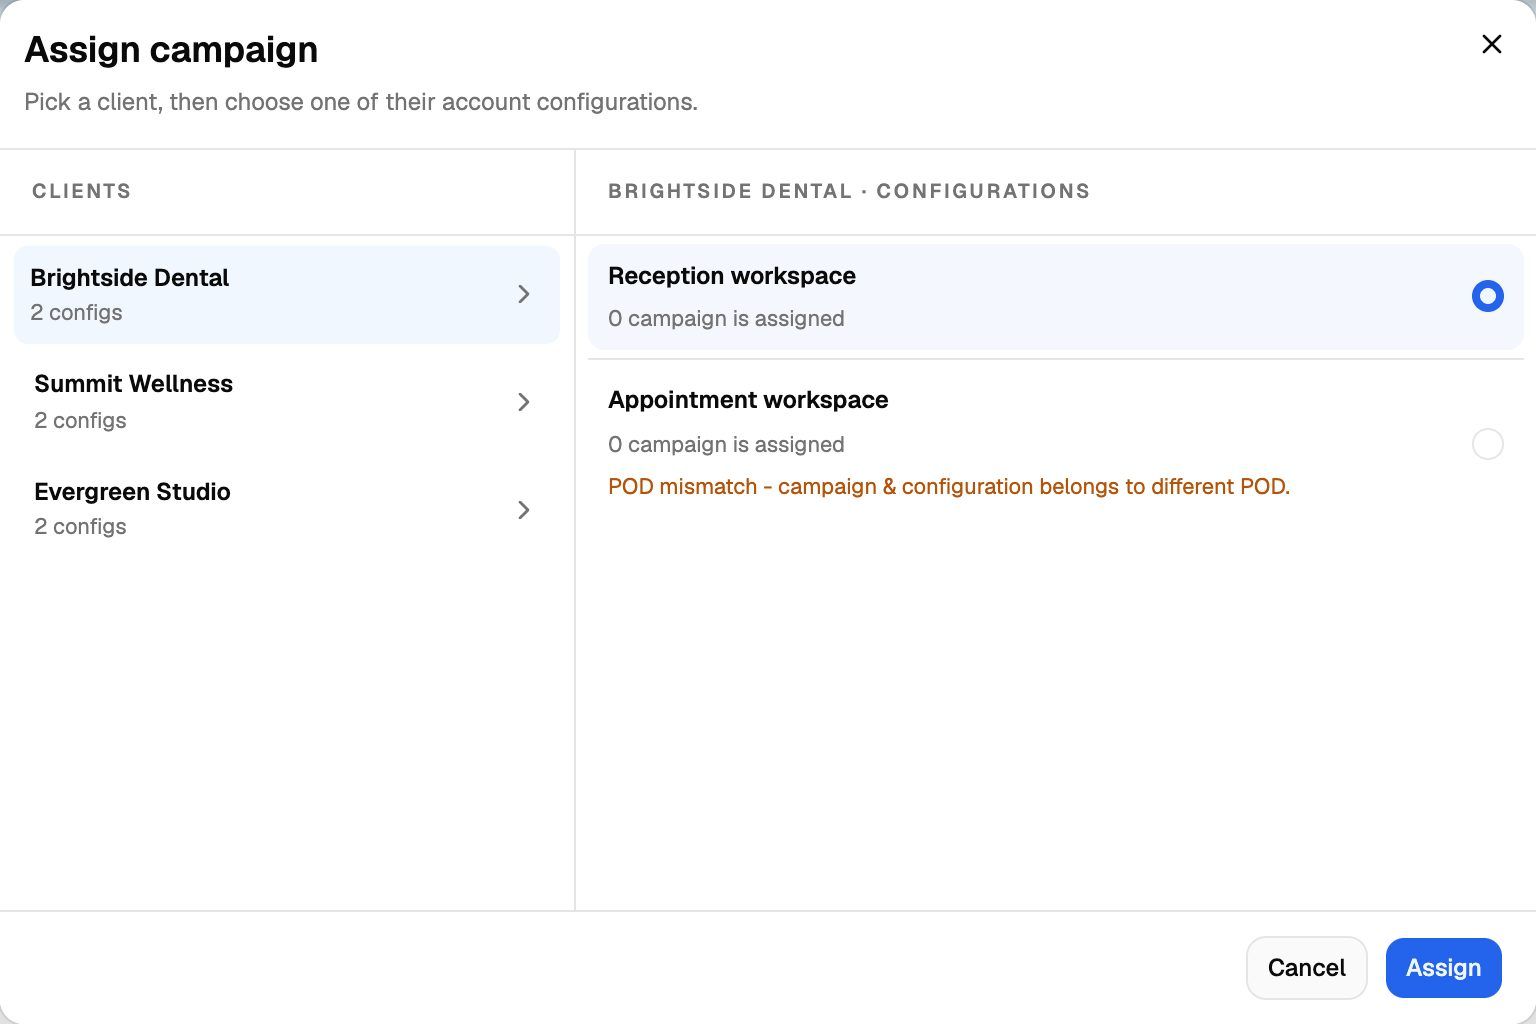
- In Assign campaign, pick a client in the Clients column. Each client shows how many workspaces (configs) it has.
- On the right, choose one of the client's workspaces. Each one shows how many campaigns are already assigned to it.
- Click Assign.
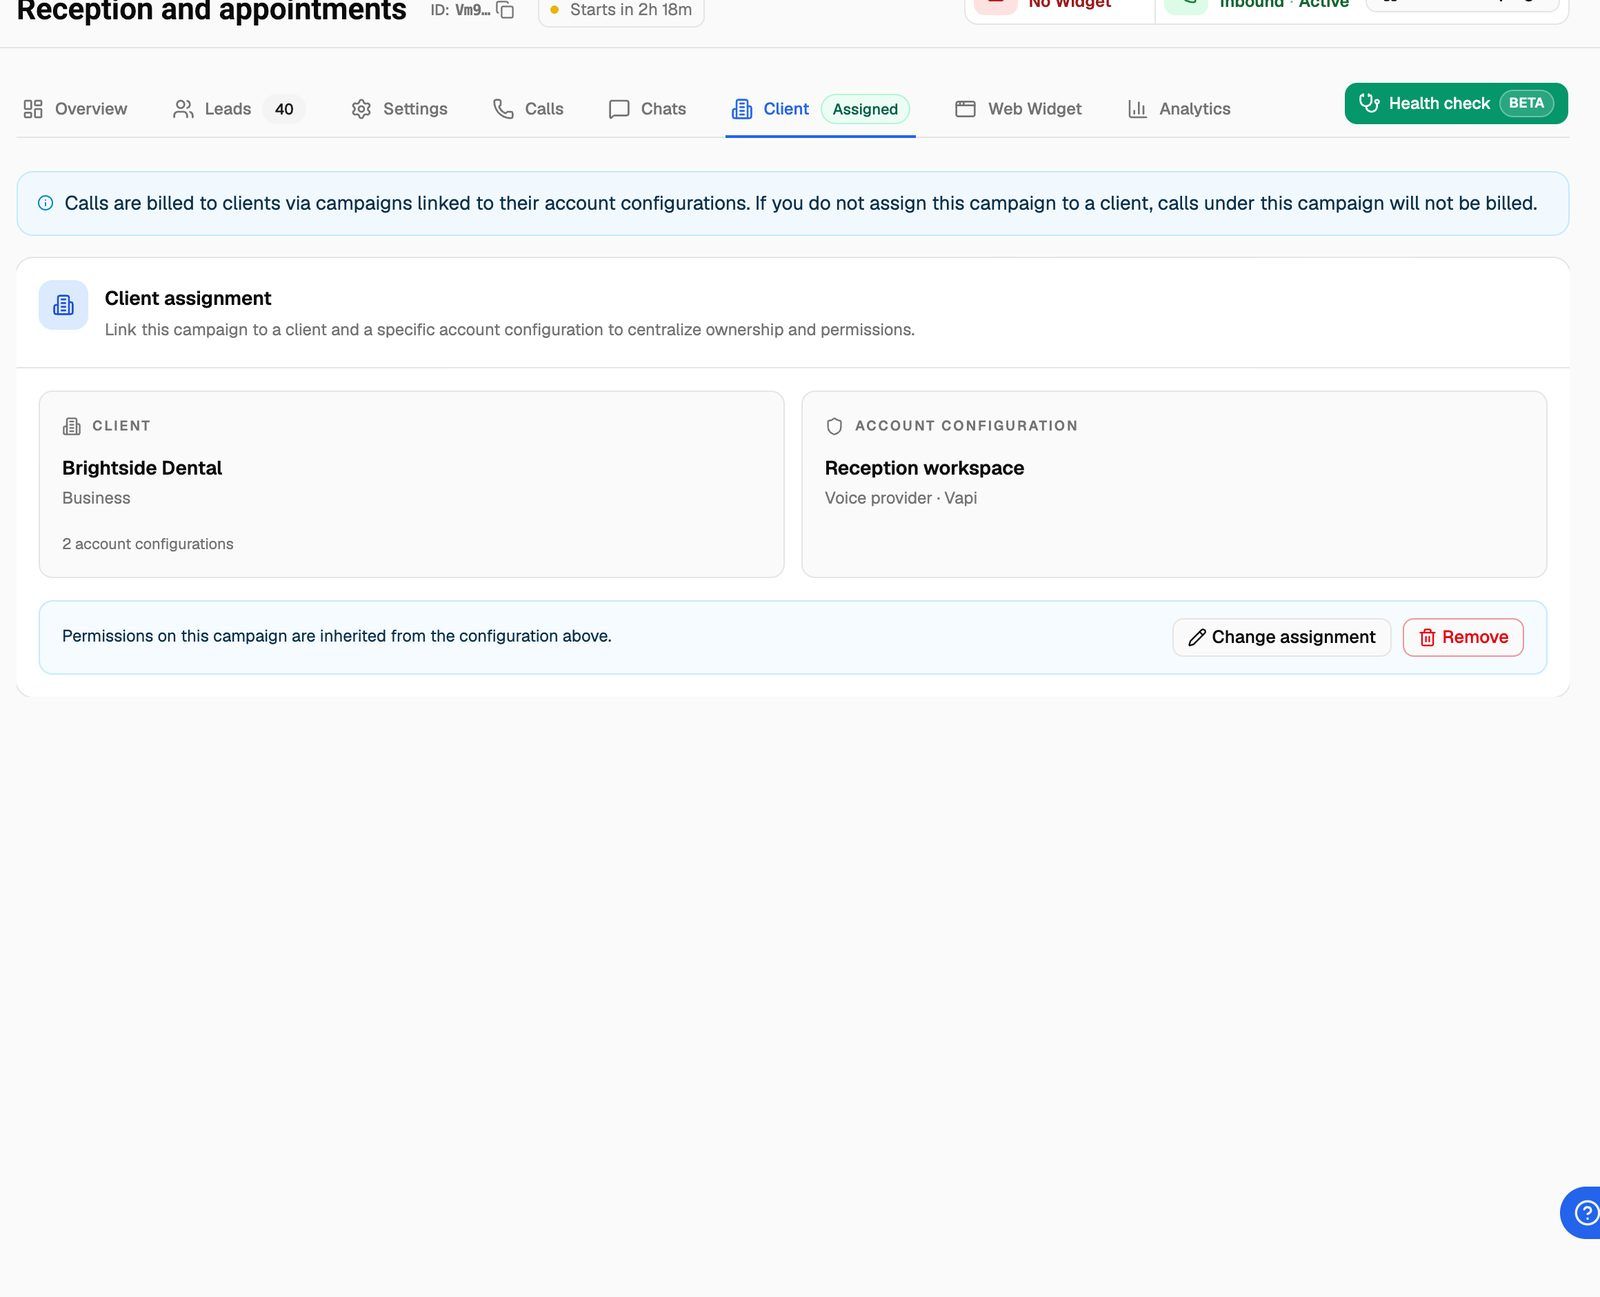
You'll see Campaign assigned to client successfully. The tab badge changes to Assigned, and the tab shows two cards: Client and Account configuration (with the workspace's voice provider).
You can only pick a workspace on the same Pod as the campaign. Workspaces on another Pod are listed but greyed out with POD mismatch - campaign & configuration belongs to different POD. This makes sure the client's calls go through the right account.
Billing starts at assignment. Calls and chats on the campaign are billed to the client from the moment you assign it. Earlier calls aren't billed retroactively.
The client's access to the campaign (what they can see and do with it) comes from the workspace's permissions. The tab reminds you: Permissions on this campaign are inherited from the configuration above. To change what the client can do, edit the workspace's permissions. See Set Client Permissions on Vapi, Retell and ElevenLabs Workspaces or Set Client Permissions on VAW Native Workspaces.
The Campaigns list has a Client Assigned column, so you can see at a glance which campaigns are unassigned (shown as "-").
Change or remove the assignment
To move the campaign to another client or workspace:
- On the Client tab, click Change assignment.
- Pick the new client and workspace, then click Assign.
The new assignment replaces the old one. From then on, new calls are billed to the new client.
To unassign the campaign: click Remove on the Client tab. It's removed straight away, with no confirmation step, and you'll see Client assignment removed. No calls, leads or settings are deleted.
After you remove the assignment, new calls on the campaign aren't billed to any client, and the client loses access to it in their portal. Assign it again if you removed it by mistake.
Fix "Wrong config": multiple clients linked
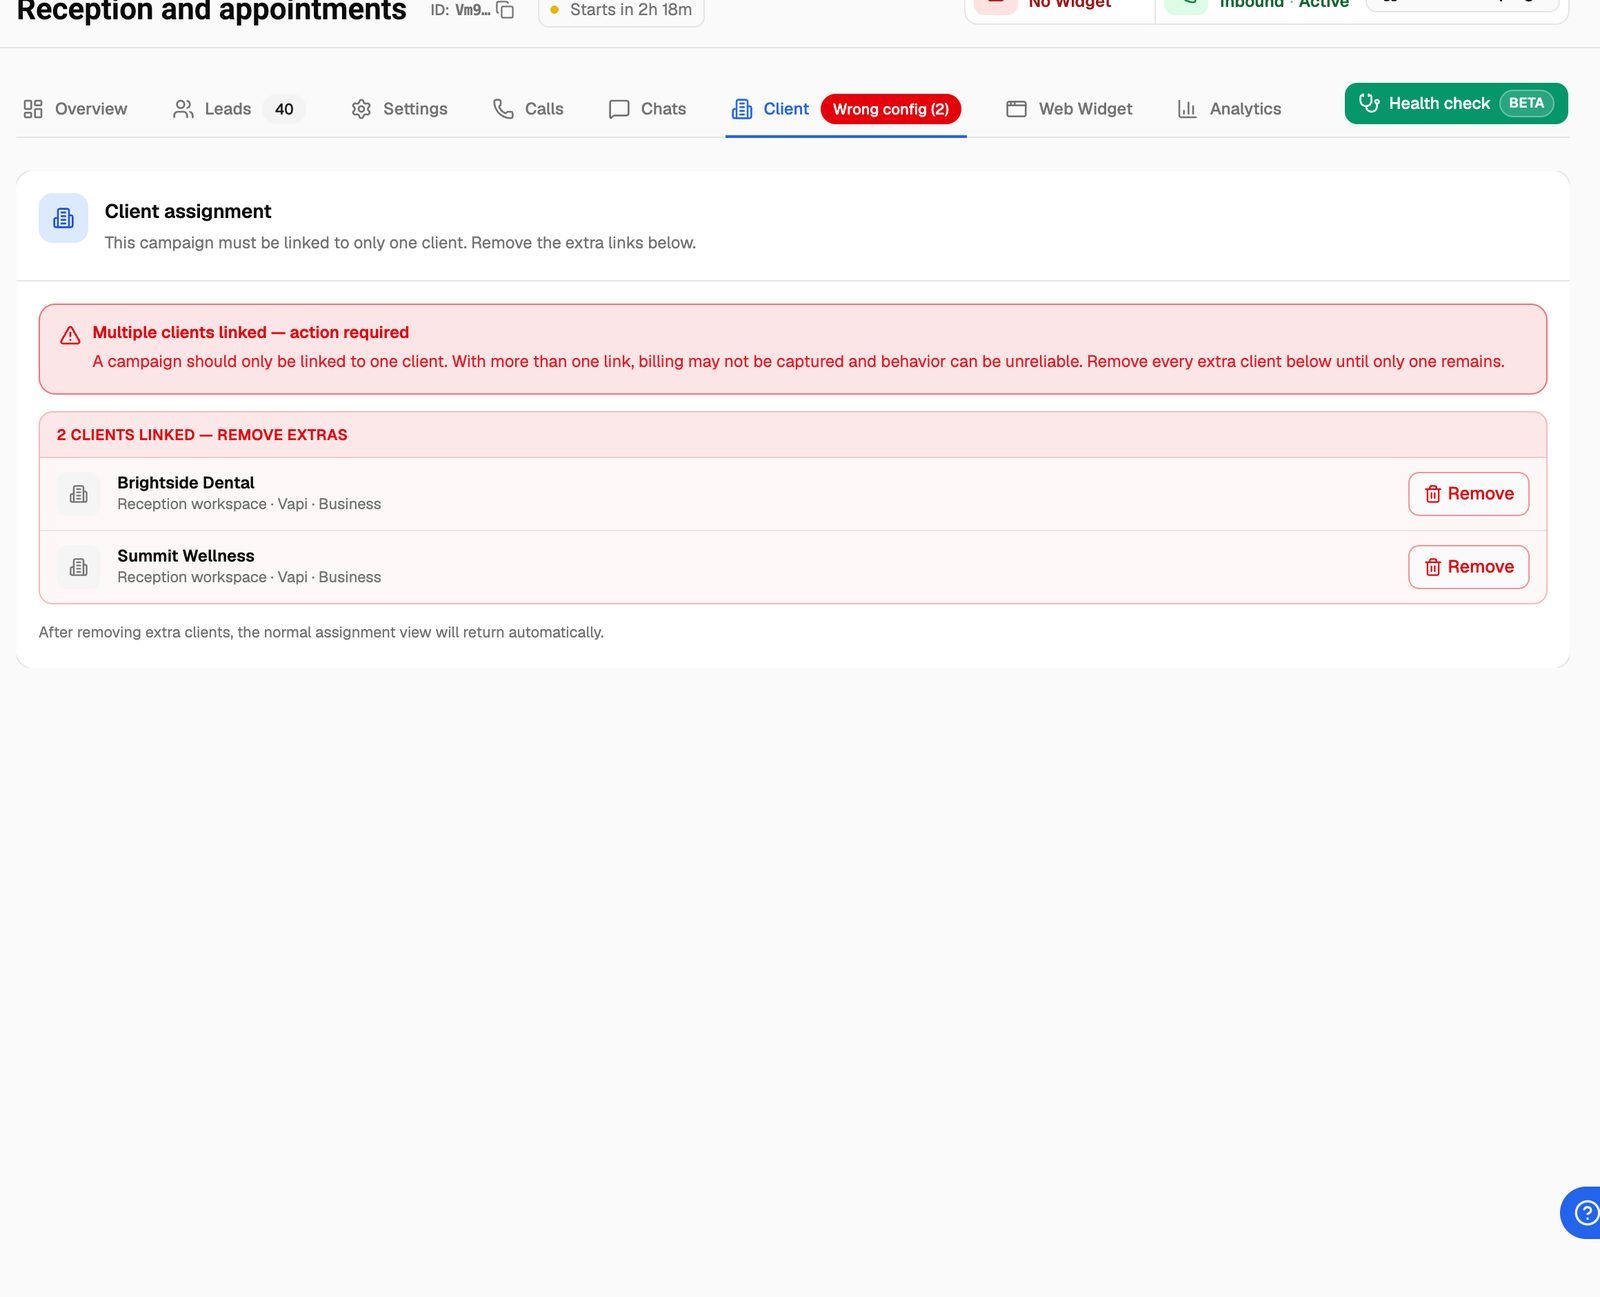
A campaign should belong to exactly one client. If it's linked to more than one, the Client tab badge turns red and reads Wrong config, with the number of clients, and the Campaigns list shows Multiple clients in the Client Assigned column. This usually happens when the same campaign is also added to another client's workspace from Client Accounts.
The tab then shows Multiple clients linked — action required: with more than one link, billing may not be captured and the campaign can behave unpredictably.
To fix it:
- Open the campaign's Client tab.
- In the list headed clients linked — remove extras, click Remove next to every client that shouldn't have this campaign.
- Stop when only one client is left. The normal assignment view comes back on its own.
Frequently asked questions
The client I want isn't in the list.
The client I want isn't in the list.
The dialog lists the client accounts in your organization. If the client is missing, create it first. See Add a Client Account. If the client shows No account configurations for this client., add a workspace for them on this campaign's Pod.
Every workspace is greyed out with "POD mismatch".
Every workspace is greyed out with "POD mismatch".
The client's workspaces are on a different Pod from the campaign. Create a workspace for the client on the campaign's Pod, then assign the campaign to it.
Can one campaign serve two clients?
Can one campaign serve two clients?
No. A campaign is billed to one client. Clone the campaign and assign each copy to a different client. See Clone, Edit and Delete Campaigns.
How do I check what my client sees?
How do I check what my client sees?
Log in as the client and open the campaign in their portal. See Log In as a Client to Preview Their Portal.
Related articles
Was this helpful?
Still need help? Share an idea