Create a Custom HTTP Tool
Let your agent call any public HTTPS API during a call: look up a record, create a ticket or add a note. Set the endpoint, the request and where each value comes from.
Written By voiceaiwrapper
Last updated 26 days ago
A custom HTTP tool lets your agent call your own systems while a caller is on the line. It can look up a booking in your CRM, open a support ticket or add a note to a patient record. You describe the request once in your Pod (an engine or provider connection). Then you attach the tool to any agent that needs it.
This article covers the Setup tab: what the tool is called, which API it calls and what goes into each request. The Response, Safety and Test tabs each have their own article, linked at the end.
Applies to: agents in a VAW Native Pod. On Vapi, Retell AI and ElevenLabs, tools are built in your provider account. See Provider Knowledge Bases and Tools in VoiceAIWrapper.
Before you start
- The API's documentation. You need the endpoint URL, the HTTP method and the fields the API expects.
- A public HTTPS endpoint. Tools only call addresses that start with
https://and are reachable from the internet. - The API key, if the API needs one. Store it as a connection first, or add one from the Setup tab. See Store API Keys with Tool Connections.
Step 1: Start a new tool
- In your VAW Native Pod, open Tools in the sidebar.
- Click New tool.
- Choose Custom HTTP tool.
The tool page opens on the Setup tab. You'll also see Response, Safety and Test. The Usage tab appears once the tool is saved.
Step 2: Name and describe the tool
Under What it does:
- Name: a short name, such as "Add call note to chart". When you attach the tool, the agent's function name is based on it.
- Description: what the tool does and when it fits, in up to 2,000 characters. The agent reads this text word for word to decide when to use the tool, so write it for the agent: "Adds a short note to the patient record. Use it to record what was agreed on the call."
Step 3: Choose a connection
Under Connection, pick the stored key this API needs, or leave it on No connection for an open API. Only Bearer token and Custom header connections appear here. Click Add a connection to create one without leaving the page.
The connection adds its own header to every request. You don't add an Authorization header yourself, and the key is never shown in the request.
Connections are shared by every Pod in your organization. Replacing a connection's key changes the next request of every tool that uses it, not only this one.
If the API refused the connection's key the last time a test used it, you'll see a red alert under Connection. The tool can't run until the key is replaced in the Connections sheet.
Don't type an API key as a header value. A typed value is stored with the tool and carried into every call. A connection keeps the key encrypted and private.
Step 4: Set the method and endpoint
Under The request:
- Choose the Method: GET, POST, PUT, PATCH or DELETE.
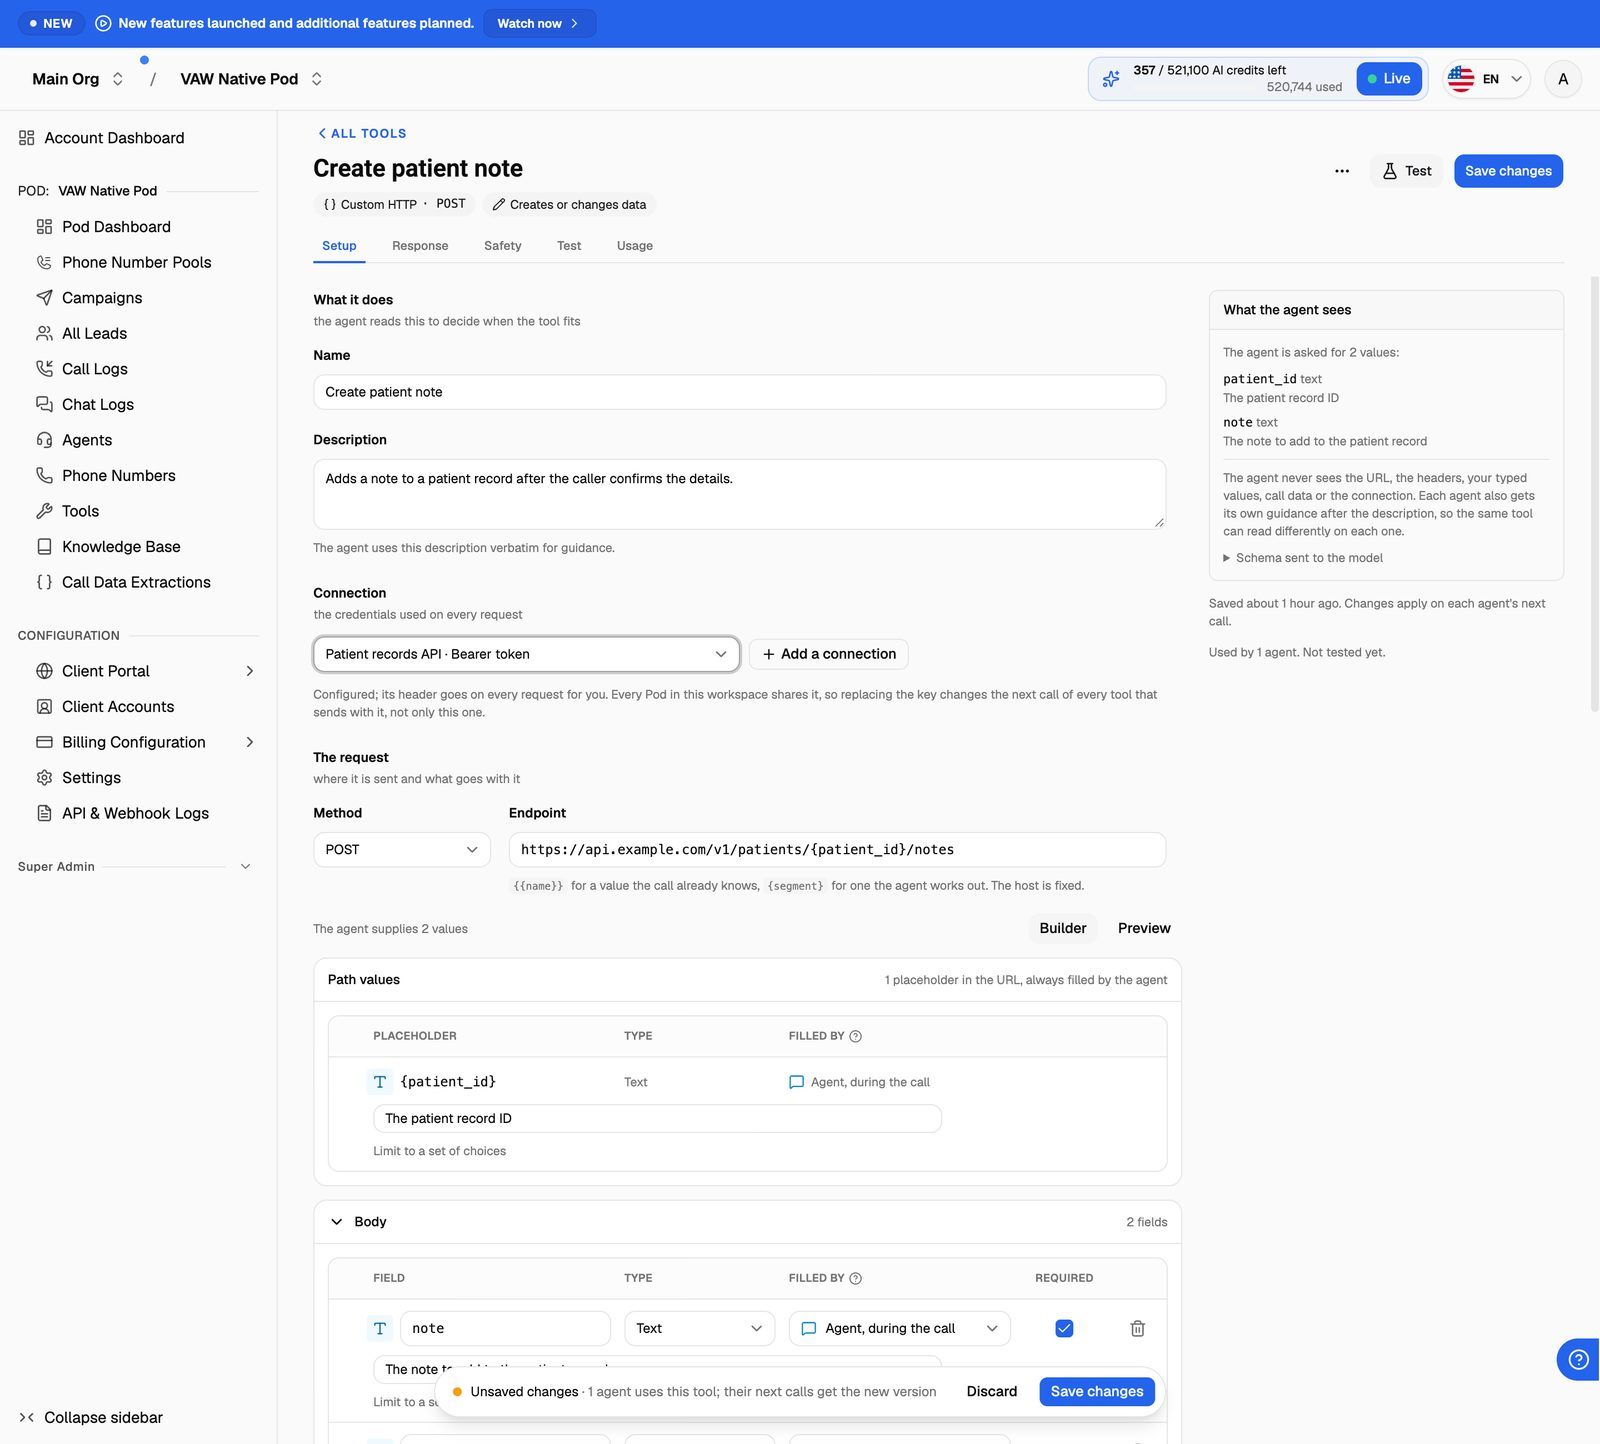
- Enter the Endpoint, for example
https://api.example.com/v1/patients/{patient_id}/notes.
You can put two kinds of placeholder in the path of the URL:
Each single-brace placeholder gets a row in a Path values card, where you describe what the agent should collect. Path values are always filled by the agent.
The host is fixed. You can't put a placeholder in the domain, and query parameters go in the Query card, not after a ? in the URL.
Step 5: Build the request
Below the endpoint, the request is split into three cards: Body, Headers and Query. A POST, PUT or PATCH shows Body first. A GET or DELETE shows Query first.
Click Add a field, Add a header or Add a query parameter to add a row. Each row has a name, a Type and a Filled by setting.
Where each value comes from
Types are Text, Number, Whole number, True or false, Object and List. Headers and query parameters take single values only.
A few more controls:
- Required: in the Body, tick this for agent-filled fields the agent must always supply.
- Limit to a set of choices: for an agent-filled value, list the only values allowed, such as
morningandafternoon. Type a choice, then press Enter. - Call data: in a Same every time value, type
{{to pick a name. The list groups names under Provided on every call (such assystem.customer_numberandsystem.call_id), Saved by another tool in this Pod and Used in an agent's instructions. You can also type a name of your own and pass it in when the call starts. See Use Call Data and Variables in Your Prompt.
Switch from Builder to Preview to see the request as it will be sent. Values the agent or call data will fill are shown in italics. The What the agent sees panel on the right lists exactly what the agent is asked for. The agent never sees the URL, the headers, your typed values, call data or the connection.
Step 6: Save the tool
Click Save changes. You'll see Tool created.
If agents already use the tool, you're asked to confirm first. Their next calls use the new version, and calls in progress finish with the current one. There's no version history: to undo a change, edit the tool and save again.
Next:
- Decide what the agent hears back on the Response tab.
- Check the write setting and timeout on the Safety tab.
- Send a real request from the Test tab.
- Attach the tool to an agent.
Troubleshooting
I see "The endpoint must start with https://".
I see "The endpoint must start with https://".
Tools only send over HTTPS. Change the URL to its https:// address. If the API only offers http://, it can't be used as a tool.
I see "Put query parameters under query, not in the URL".
I see "Put query parameters under query, not in the URL".
Remove everything from the ? onwards in the Endpoint. Add each parameter as a row in the Query card instead.
I see "The host is fixed; placeholders belong in the path".
I see "The host is fixed; placeholders belong in the path".
The domain can't contain a placeholder. Type the full domain and put placeholders after it, in the path.
The save button does nothing, or I see "Some names in the request need fixing. The builder marks each one."
The save button does nothing, or I see "Some names in the request need fixing. The builder marks each one."
A row has a problem with its name. The rows with a problem are marked in red, and their cards open automatically. Common causes:
- A missing name. Every field, header and query parameter needs one: it's the key the API receives.
- A duplicate name. Two rows in the same place share a name.
- A header name with a space or other invalid character. Header names take letters, numbers,
-or_, with no spaces. - An invalid per-agent name. The name shown on each agent for a Set per agent value can use letters, numbers,
-and_, with no spaces, up to 64 characters. - An empty object. An Object needs at least one property inside it.
I see "localhost is not reachable from VAW" or "is not a public address".
I see "localhost is not reachable from VAW" or "is not a public address".
Tools can't call your own computer or a private network address. Use the API's public HTTPS address.
The tool works in testing but on a call the agent says "That can't be done right now."
The tool works in testing but on a call the agent says "That can't be done right now."
A value written as {{name}} had no value on that call, so the request wasn't sent. Make sure the call passes that call data in, or that the tool which saves it runs first. To see what happened, open the call in Call Logs and expand the tool's entry in the transcript.
I added a "Set per agent" value and now agents can't use the tool.
I added a "Set per agent" value and now agents can't use the tool.
Each agent that already uses the tool needs a value for the new field before it can run the tool again. Open the agent's Tools tab and fill it in. See Attach Tools to an Agent.
Related articles
Was this helpful?
Still need help? Share an idea