Join, Create and Switch Organizations
Use the organization selector to switch between organizations, accept or decline invitations, create a new organization and copy its ID.
Written By voiceaiwrapper
Last updated 26 days ago
You can belong to more than one organization, for example your own agency and a partner agency that invited you. Each organization is separate: it has its own Pods, agents, campaigns, clients, team and billing. The organization selector at the top of the webapp is where you switch between them, answer invitations and copy an organization's ID.
The organization selector
The selector is the organization name at the top left of the header, just before the Pod selector. On a phone, open the sidebar menu: the selector is at the top.
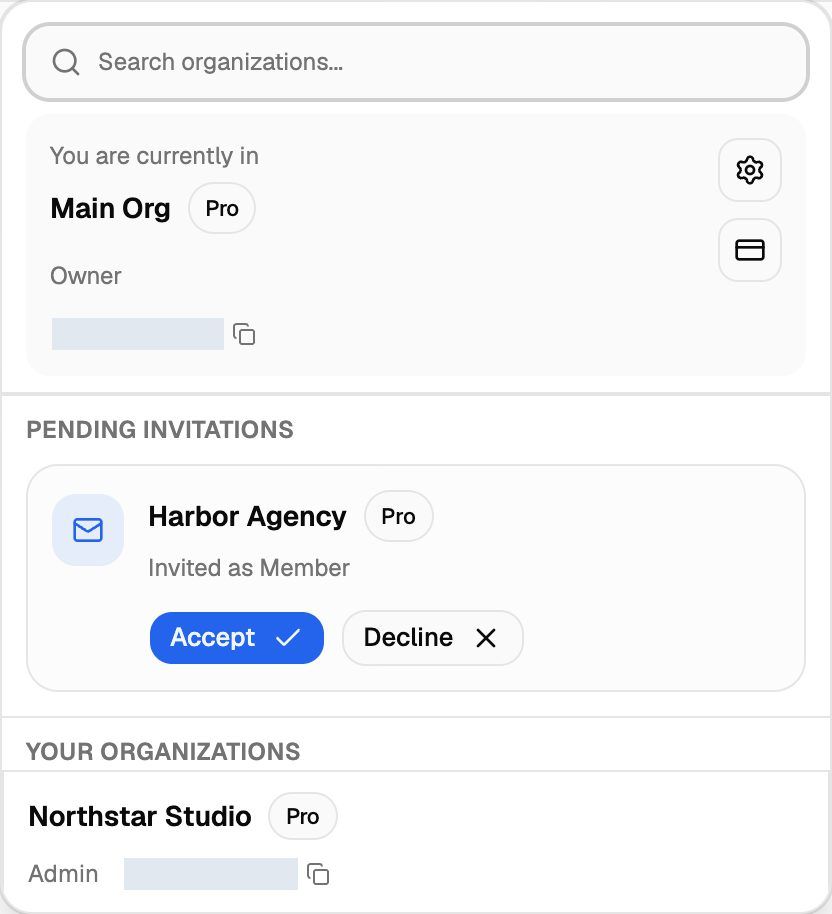
Click it to open the menu. From top to bottom it shows:
- Search organizations...: filter your organizations and invitations by name. You can also search organizations by ID.
- You are currently in: the organization you're working in, its plan, your role and its ID with a copy button. The gear icon opens Organization settings, and the card icon (Payment) opens the Billing section of Settings.
- PENDING INVITATIONS: organizations that have invited you, with Accept and Decline.
- Every other organization you belong to, with its plan, your role and its ID. When you also have pending invitations, this list sits under the heading YOUR ORGANIZATIONS. If you only belong to one organization and have no invitations, you'll see No other organizations.
A small blue dot on the selector means you have a pending invitation.
Switch to another organization
- Click the organization name in the header.
- Click another organization in the list.
The webapp opens that organization's home page. It doesn't keep you on the page you were viewing, because that page (a campaign or a Pod, say) belongs to the organization you just left. The webapp remembers your choice the next time you open it in this browser.
Accept or decline an invitation
When someone invites you, you get an email with a link to join their organization. You can answer it from the email or from the selector.
From the invitation email
Click the link in the email. What you see depends on whether you're signed in:
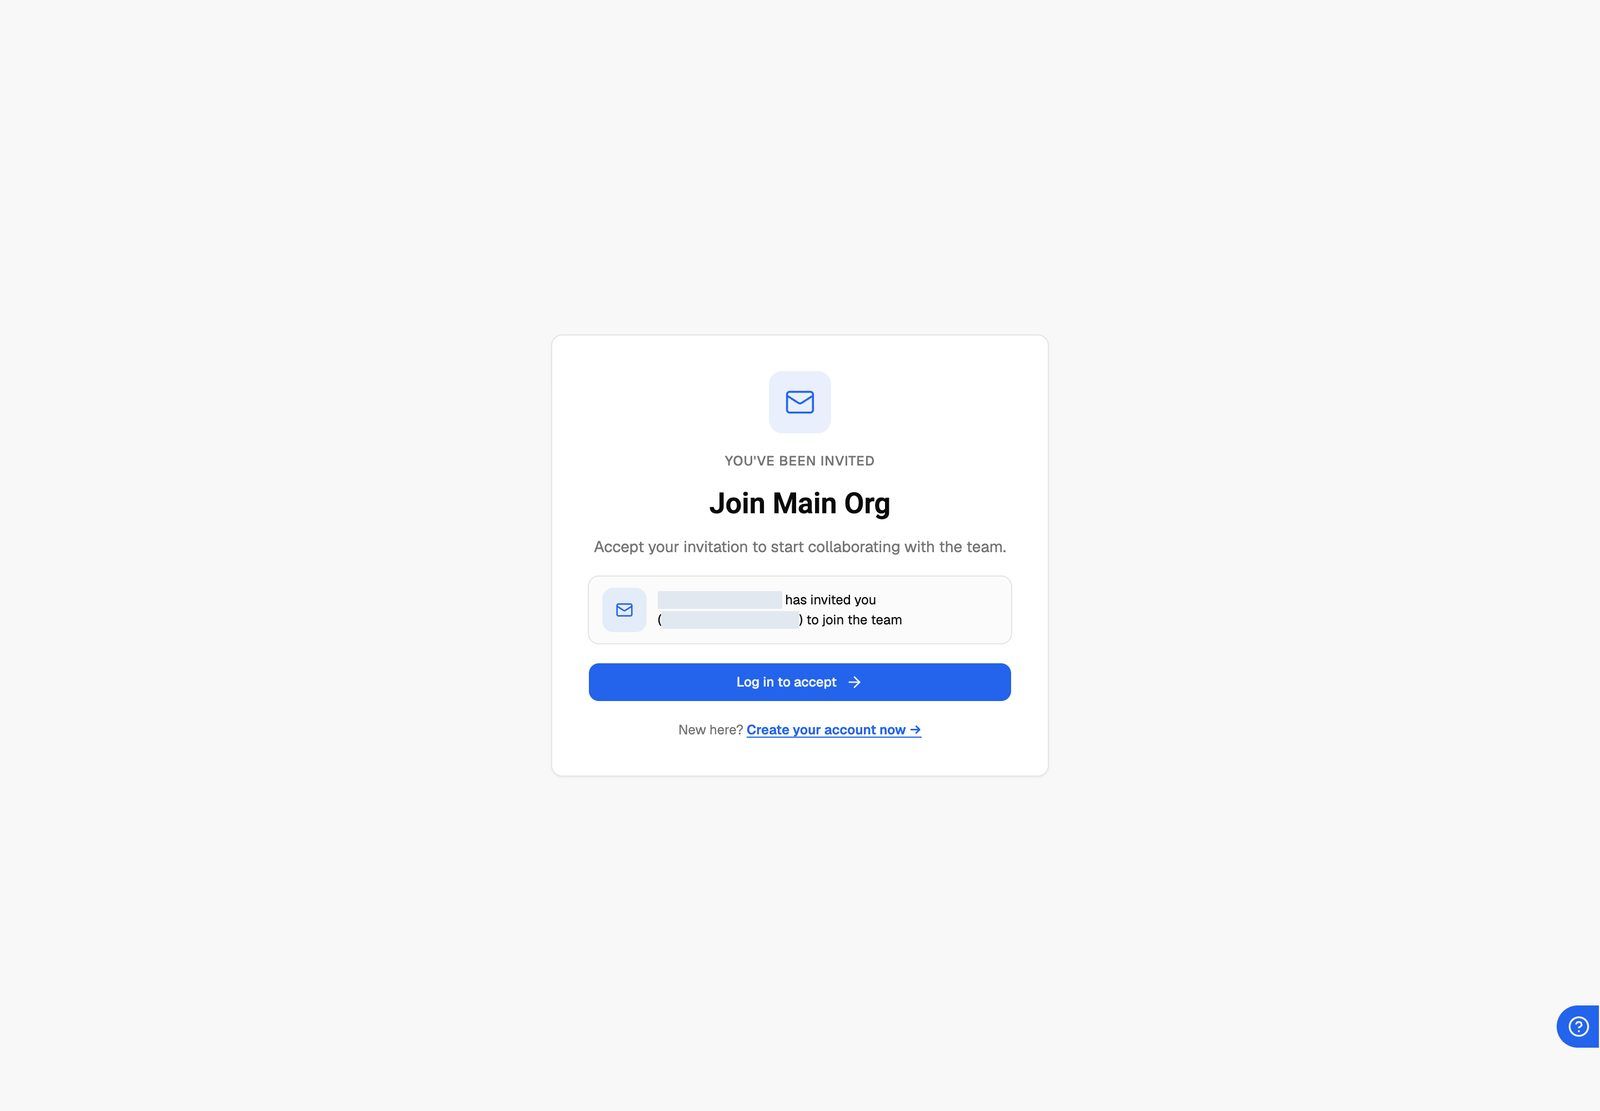
If you sign up with the invited address, the webapp doesn't create a separate organization for you and skips the setup wizard. Once your account is ready and you're signed in, open the invitation link from the email again and click Accept.
Sign-up only accepts business email addresses. If your teammate invited a personal address (such as a Gmail account) and you don't have an account yet, ask them to invite your work address instead.
From the organization selector
If you already have an account with the invited address, the invitation also appears under PENDING INVITATIONS in the selector, with the role you were invited as ("Invited as Admin", for example).
- Click Accept to join. You'll see Invitation accepted!, and the webapp switches you into that organization.
- Click Decline to turn it down. You'll see Invitation declined. and the invitation is removed. To join later, ask for a new invitation.
Create another organization
Create a separate organization when you want completely separate Pods, clients, team and billing, for example for a second brand.
- Go to the Add Organization page (see the note below for how to reach it).
- Enter a name in Org Name:.
- Click Save changes.
You'll see Organization added successfully! and land in the new organization. You're its creator and Owner. A new organization has no subscription, so you'll be asked to choose a plan for it before you can use it. Billing is separate for every organization. See Choose a Plan and Add a Payment Method.
A new organization has its own subscription. Choosing a plan for it can start a separate charge on your card.
The organization selector only shows Create Organization when you don't belong to any organization yet and have no pending invitations. If you already belong to one, open the Add Organization page directly: in your browser's address bar, keep the webapp's address and replace everything after it with /en/add-tenant.
Copy your organization ID
Support may ask for your organization ID. You can copy it from either place:
- Organization selector: click the copy icon next to the ID in You are currently in. Other organizations in the list have their own copy icon.
- Settings → General: click the copy button in the Tenant ID field. It's the same ID. See Organization Settings Overview.
Troubleshooting
The invitation page says "This invitation is no longer valid."
The invitation page says "This invitation is no longer valid."
The invitation was cancelled, declined or removed. Ask the person who invited you to send a new one.
The invitation page says "This invitation link is incomplete."
The invitation page says "This invitation link is incomplete."
The link is missing part of its address, which can happen when it's copied or wrapped by an email client. Open the full link straight from the email, or ask for a new invitation.
Clicking Accept shows an error or doesn't do anything.
Clicking Accept shows an error or doesn't do anything.
The invitation may have expired. Invitations expire 14 days after they're sent. Ask an Owner of that organization to remove your pending invitation and invite you again.
I don't see the invitation in my organization selector.
I don't see the invitation in my organization selector.
Check that you're signed in with the exact email address the invitation was sent to. Invitations only show for that address.
I switched organizations and my agents disappeared.
I switched organizations and my agents disappeared.
Agents, Pods, campaigns and clients belong to one organization. Switch back to the organization where you created them.
Related articles
Was this helpful?
Still need help? Share an idea