Manage Your Agents
View and edit your agents' prompts, make test calls, build a new agent with the AI builder, and use the agent settings tabs your provider has opened.
Written By voiceaiwrapper
Last updated 26 days ago
Your agents are the AI voices that answer and make your calls. In the portal you can check what an agent says, try it out with a test call, and, if your provider allows it, change its prompt or build new agents. Your provider decides exactly which of these you can do in each workspace.
Before you start
- Open Agents in the sidebar. In some workspaces the section is called Assistants; it works the same way.
- If the page says You do not have access to this section., your provider hasn't given this workspace access to agents.
Your Agents page looks one of two ways, depending on how your workspace is set up:
The agent list
The list shows each agent's Name, ID and First message, with your actions in the Actions column.
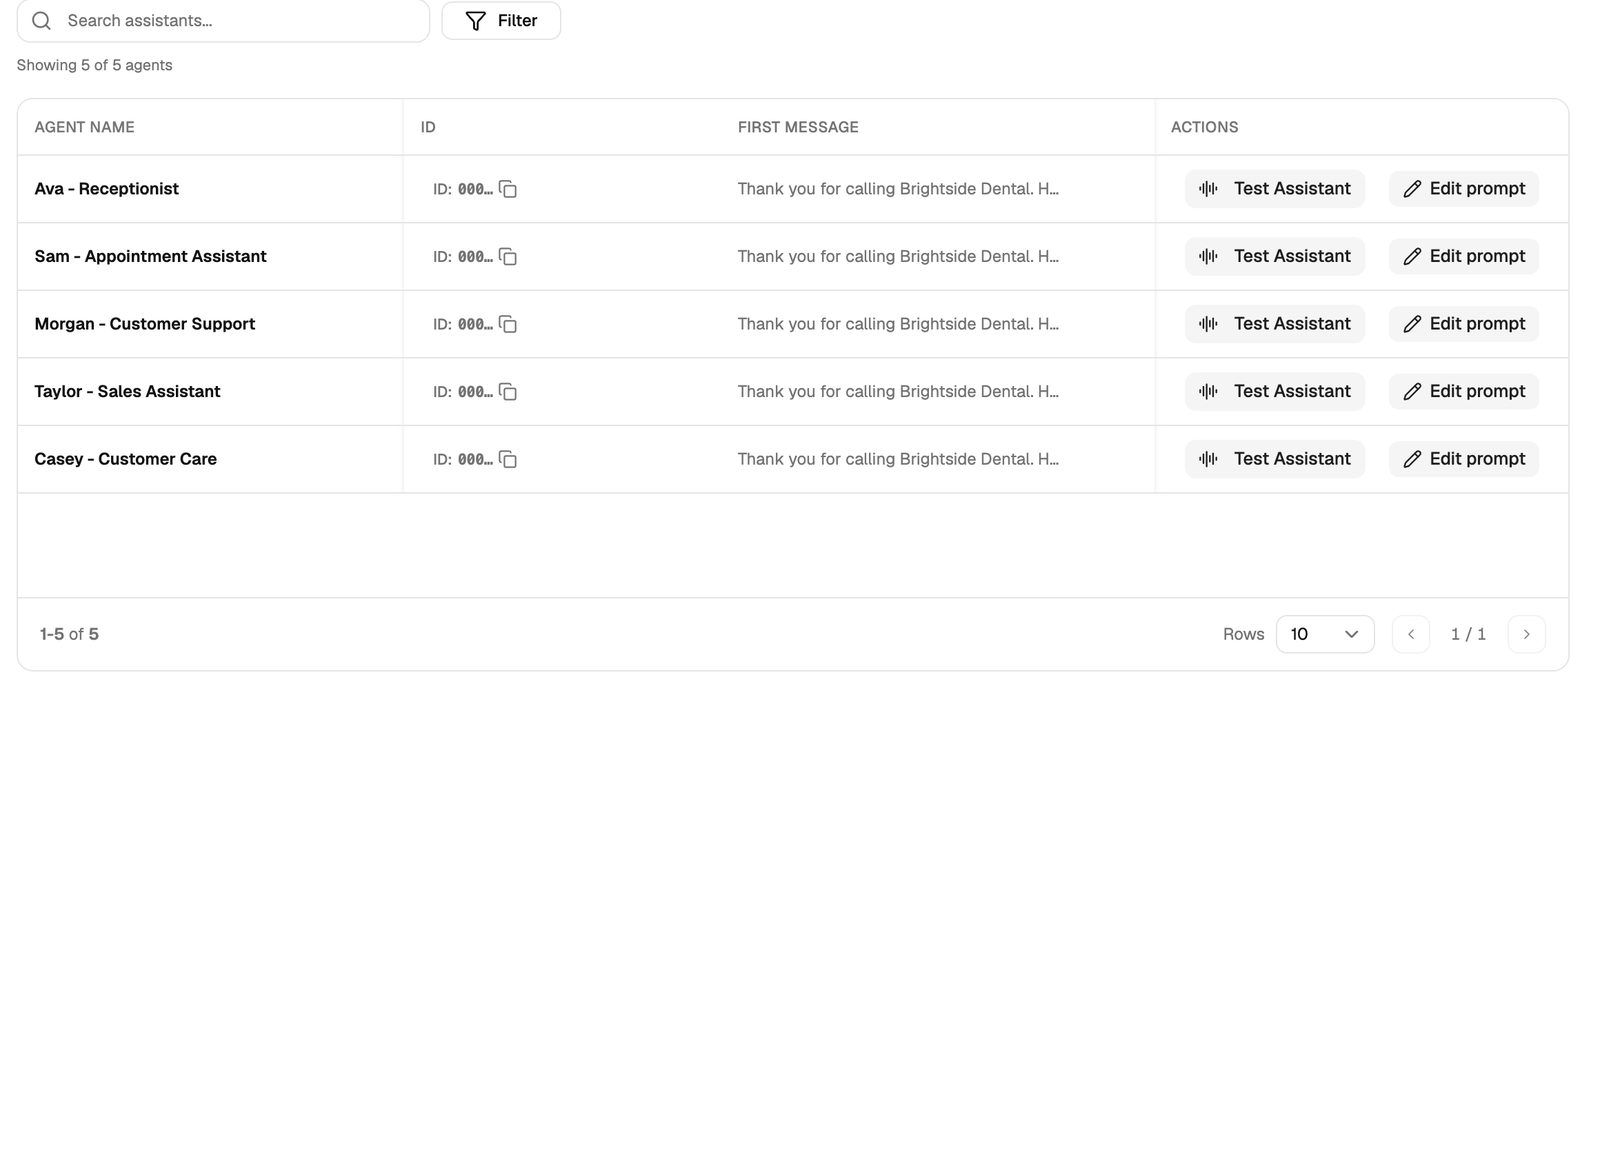
View or edit a prompt
You'll see View prompt if you can read the prompt, or Edit prompt if you can also change it. If you see neither, your provider hasn't shared prompts with you.
- Click View prompt or Edit prompt on the agent's row, or click the row itself. A panel opens with the agent's name and ID.
- Read or change the fields. Most agents have a greeting (called First Message, Welcome Message or Greeting (fixed text)) and a System Prompt with the agent's instructions. Some also let you choose who speaks first (Welcome Message Type or Who speaks first).
- To save, click the button at the bottom of the panel: Update Agent, Update Assistant or Save changes. It stays greyed out until you change something.
The System Prompt can't be left empty, and on some agents neither can the greeting. If a required field is empty, a message appears under it and nothing is saved.
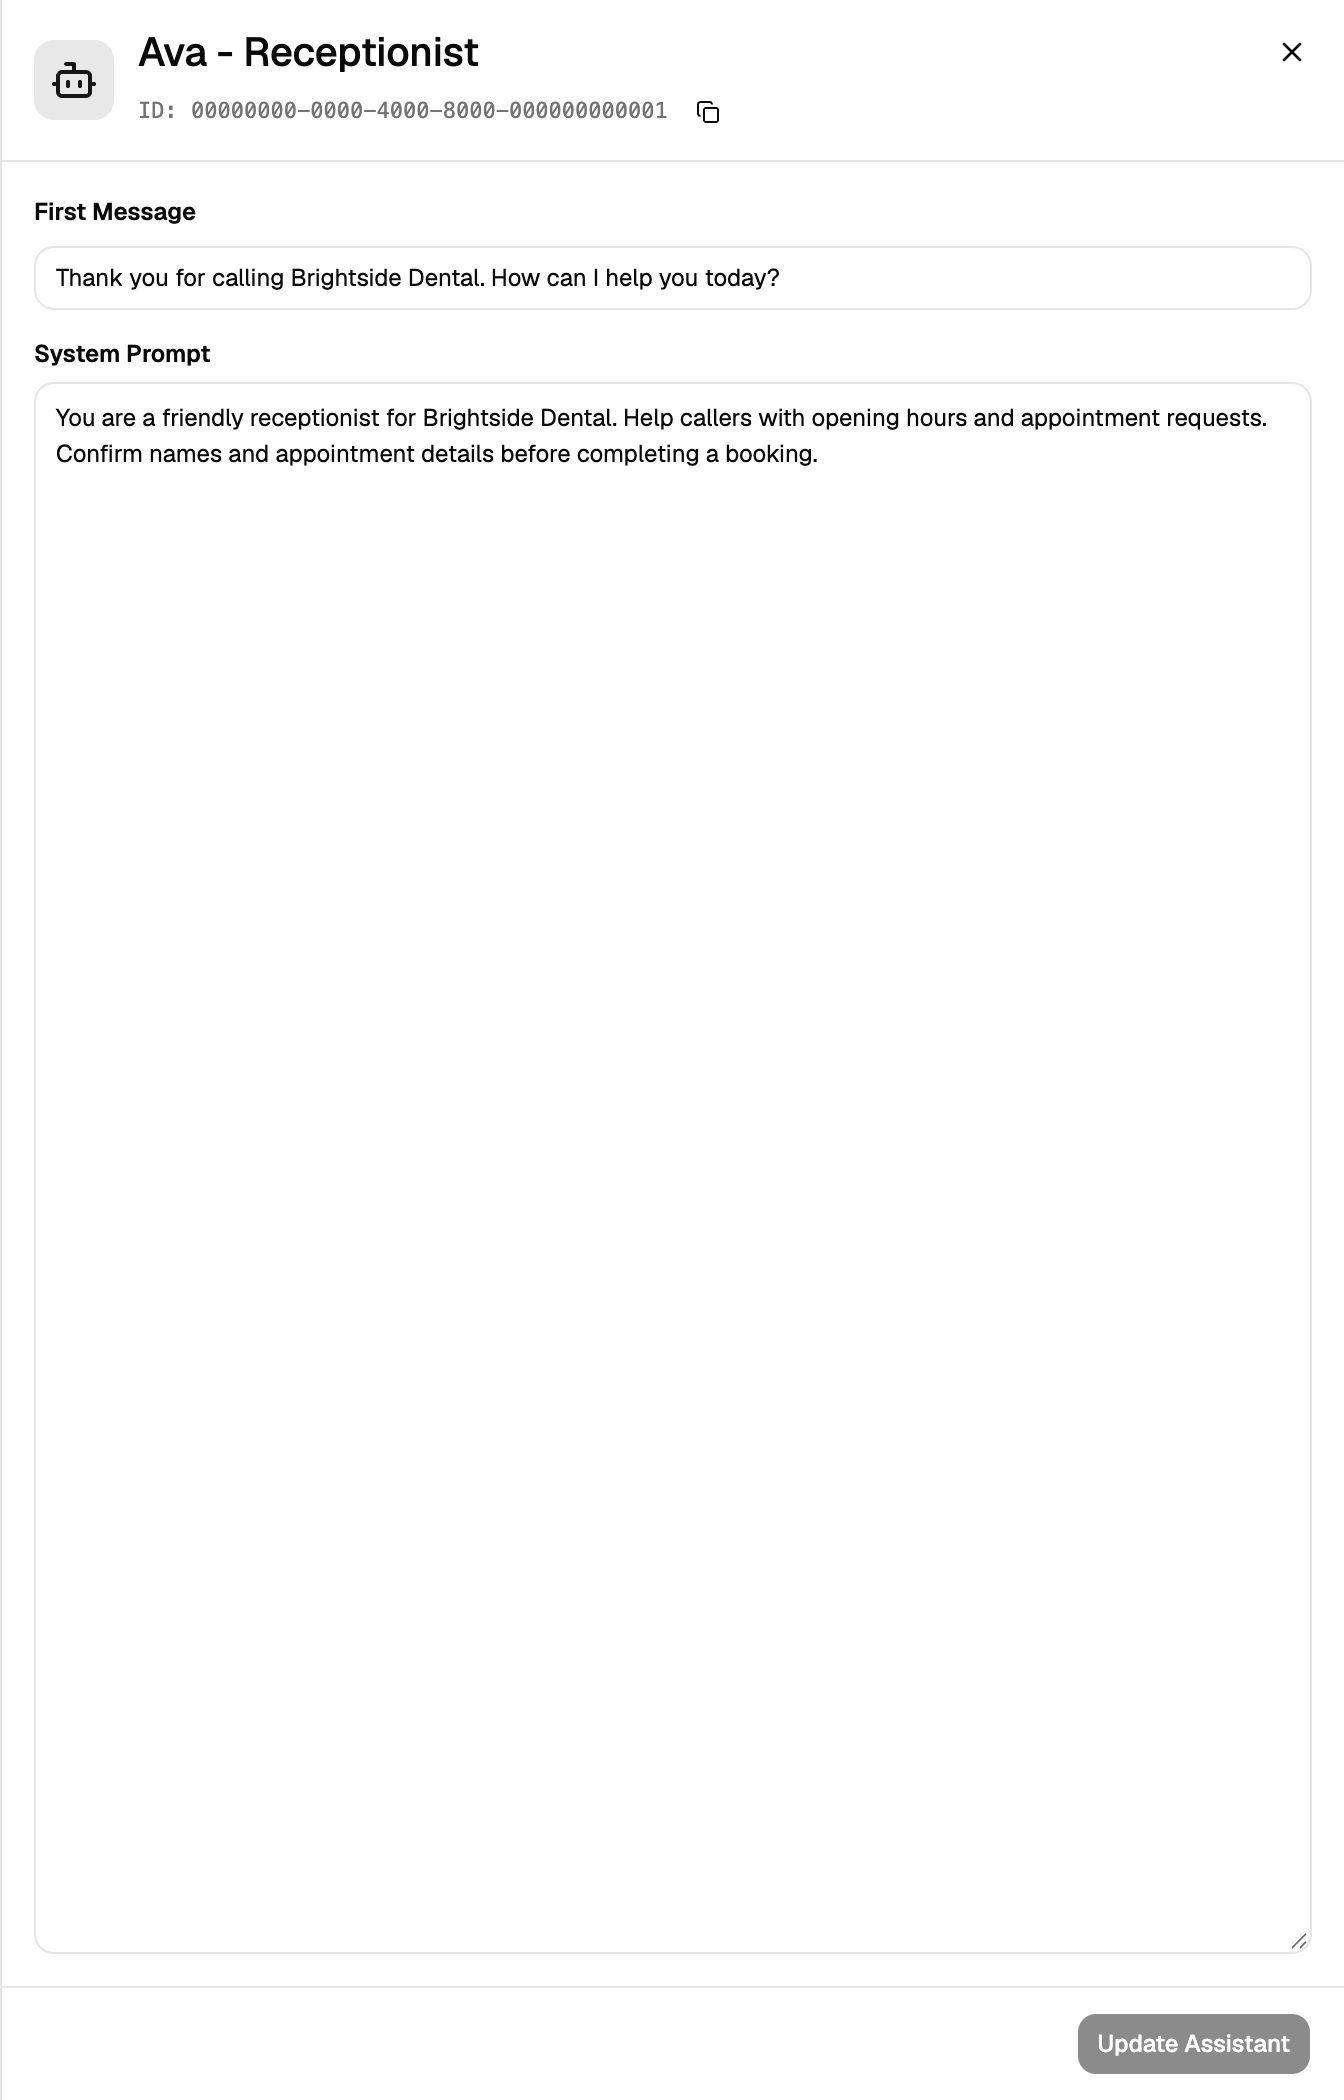
Saving changes the live agent, so its next call uses the new prompt. Make a test call after any change.
Some agents are built as a step-by-step conversation flow instead of a single prompt. For those, the panel shows Editing this agent is not allowed.
Make a test call
A test call is a live conversation with your agent through your browser. You need a microphone.
- Click the test button on the agent's row (Test agent, Test Agent or Test Assistant, depending on the workspace).
- Start the call and allow microphone access when your browser asks.
- Talk to the agent as a caller would, then end the call.
On some agents, if the prompt uses variables (placeholders such as a caller's name), the test window lists them under Custom Variables:. Click Edit custom variables to fill in test values. Runtime Variables: are filled in automatically during the call.
If there's no test button, your provider hasn't turned on test calls for this workspace.
Build an agent with the AI builder
If your provider has turned it on, you'll see a Create with Agent Builder button at the top of the Agents page (and a banner on your dashboard). The builder asks you a few questions and writes the agent's greeting and prompt for you.
- Click Create with Agent Builder. The builder opens full screen.
- Work through the steps on the left: Industry, Template, Business, Behavior, Tools and Review & create. Use Continue → and ← Back to move between them, and Skip this step where it's offered.
- On Business, choose Generate with AI to have the builder read up to 10 pages of your site and fill in the details, or Enter manually to type them yourself. You can edit anything it fills in.
- On Review & create, check the name, voice, greeting and system prompt, then click Create agent.
When it's done, you'll see … is ready. The new agent appears in your agent list, where you can test it.
The new agent can't take phone calls yet: you'll see Not reachable by phone yet. Phone numbers are connected through a campaign. If you can create campaigns, click Create a campaign → (or Create your first campaign →); otherwise ask your provider to add the agent to one. See Run Campaigns and Manage Leads.
To leave part-way, click Exit (and Leave if you're asked to confirm). Your answers are saved on this device and are there when you come back.
In this type of workspace you can't delete agents. Ask your provider if you need one removed.
Agent pages with settings tabs
In these workspaces the Agents page says "The agents assigned to your workspace." and shows how many you've used out of your limit, for example 3 of 5 used.
- Create an agent: click New agent. An Untitled agent is created and opens so you can set it up. If you've reached your limit, the button is greyed out, and hovering over it shows Your workspace is limited to … agents.
- Open an agent: click its row.
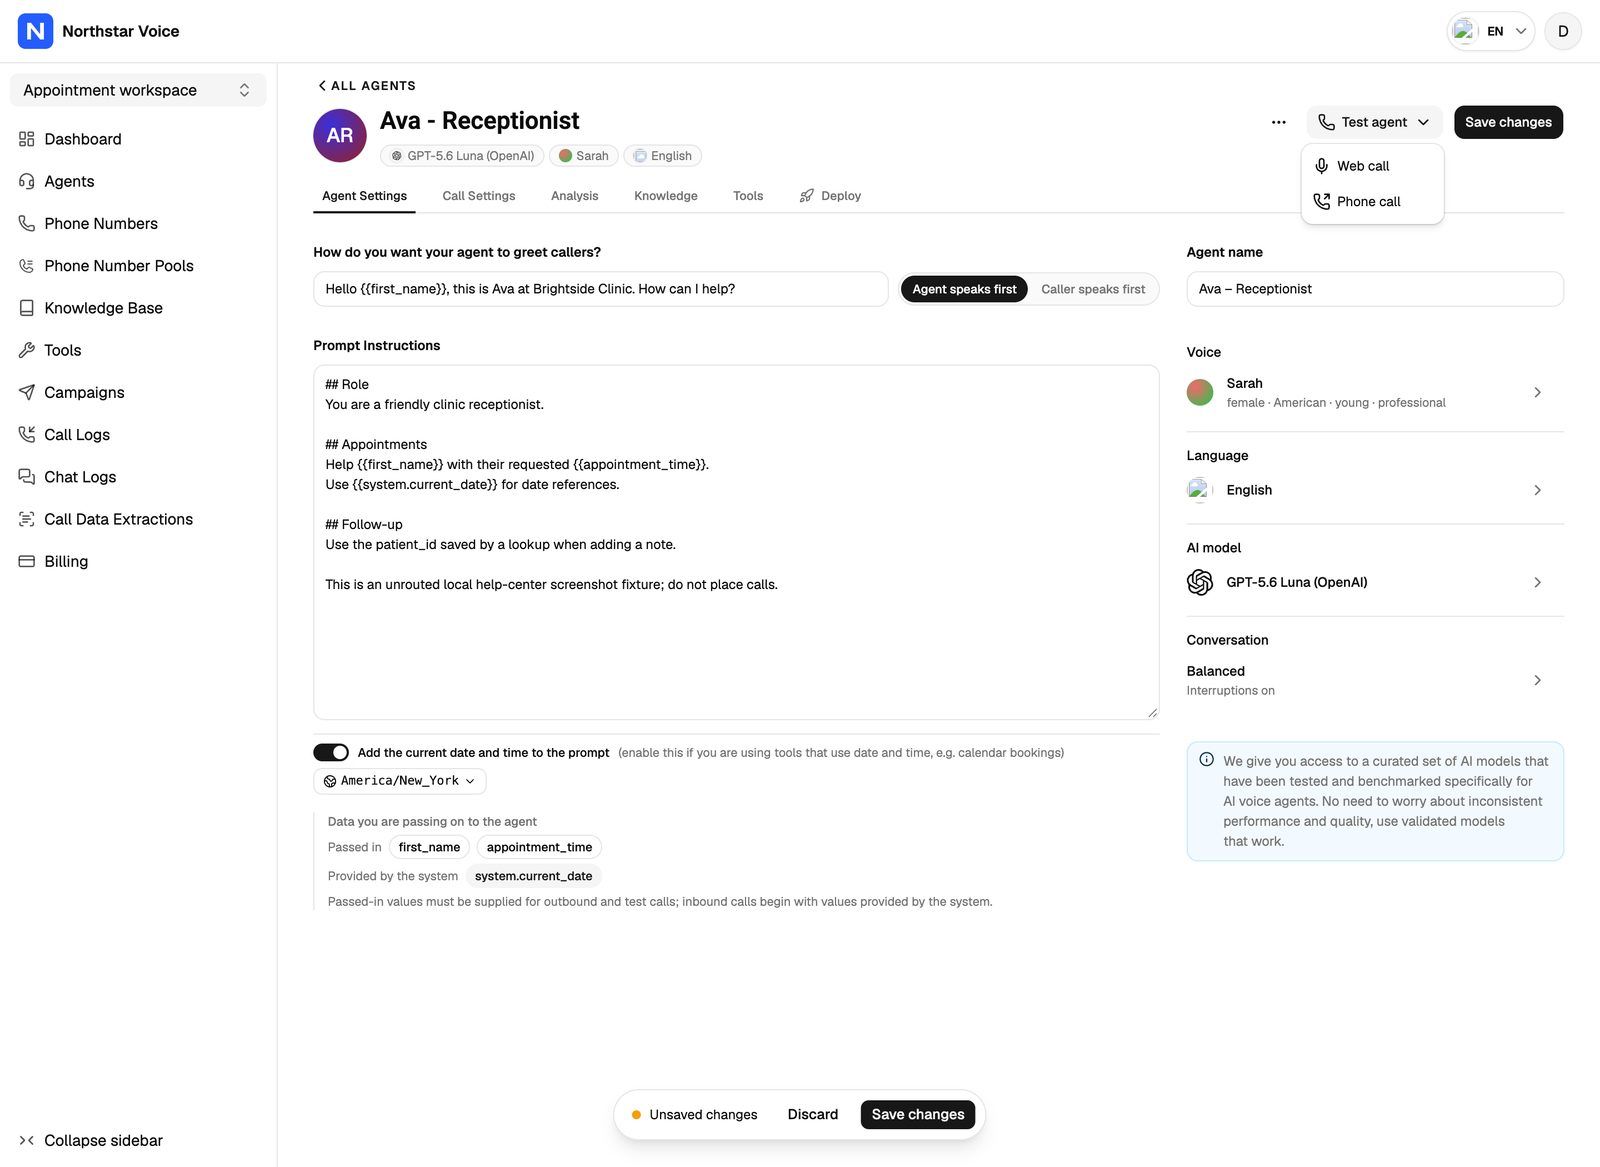
The tabs
You only see the tabs and rows your provider has opened for you, and some may be view-only. A setting you can't change appears greyed out.
Save your changes
After changing anything on Agent Settings, Call Settings or Analysis, click Save changes at the top of the page. When everything is saved, the button shows Saved. Saved changes apply to the agent's next call.
Some parts save on their own instead:
- Knowledge bases and Call Data Extractions: after attaching or detaching, click Apply (or Discard to undo). This applies immediately and isn't part of Save changes.
- Tools: each tool's panel has its own save button.
Test the agent
- Click Test agent at the top of the page.
- Choose a test:
- Web call: talk to the agent in your browser. Click Start test call, allow your microphone, and speak. Click End test when you're done.
- Phone call: the agent calls a real phone. Pick a number under Show as caller ID, enter the Number to call in international format (starting with
+and the country code), and click Place test call. Then answer your phone.
The transcript of a phone test appears in Call Logs when the call ends, along with the recording if Record calls is on. If the agent has tools that create or change real data, such as booking an appointment, the test window warns you first: those tools really run during a test.
If you only see one of the two options, or no Test agent button at all, your provider has turned the others off.
Connect phone numbers and call out
Open the Deploy tab.
- Inbound: click Connect number, pick one of your numbers, and confirm. Calls to that number now go to this agent. Each number answers as one agent only, so connecting a number another agent uses moves it to this one. To disconnect a number, click the unlink icon next to it, then Stop answering. If a number isn't reaching the agent, a red message appears with Retry and Check connection.
- Outbound: enter the Number to call, pick a number under Show as caller ID, and click Call now. If you see "placing calls is not enabled for you", you can view this tab but not call out.
- Widget: click Add now to create a chat and voice widget for this agent, set it up, and copy its embed code onto your site. If you can only view this tab, you'll see the embed code once your provider has added a widget.
Call now places a real phone call to the number you enter, using one of your numbers. The call appears in Call Logs.
If you can add numbers, the Connect number panel also offers Need another number? with Use a number I own and Buy a new number.
Buy a new number buys a real phone number on your connected phone account, and you're charged for it.
Remove widget stops the widget showing on every site that uses its embed code. Its past conversations stay in the logs.
Copy the agent ID or delete the agent
Click the … menu at the top of the agent's page:
- Copy agent ID copies the ID, for example to share with your provider.
- Delete removes the agent. You can also delete from the list with the bin icon.
Deleting an agent can't be undone. The agent stops answering calls immediately.
Troubleshooting
I can see the prompt but can't change it.
I can see the prompt but can't change it.
Your provider has given you view-only access. Ask them if you need to edit prompts.
The page says "This section is not available on your current plan."
The page says "This section is not available on your current plan."
Agents aren't included in your provider's current plan for this workspace. Contact your provider.
New agent is greyed out.
New agent is greyed out.
Your workspace has reached its agent limit. Hover over the button to see the limit. Delete an agent you no longer need, or ask your provider to raise the limit.
I see "Could not save the agent."
I see "Could not save the agent."
The change wasn't saved. Refresh the page and try again. If it keeps happening, contact your provider with the agent's name and what you were changing.
The Phone call test says there's no active number.
The Phone call test says there's no active number.
Your workspace has no phone number to call from yet. Click Test with a web call instead, or add a number under Phone Numbers if you have access.
My agent isn't answering calls on my number.
My agent isn't answering calls on my number.
On the Deploy tab, open Inbound and check the number is listed there. If it shows a red "is not reaching" message, click Retry. If the number belongs to a campaign, calls follow the campaign's settings instead, even while the campaign is paused. See Run Campaigns and Manage Leads.
Related articles
Was this helpful?
Still need help? Share an idea