Import Leads from a CSV File
Upload up to 30,000 leads at once from a CSV file: download the template, match your columns, fix any errors and import.
Written By voiceaiwrapper
Last updated 26 days ago
A CSV import is the fastest way to load a list of contacts into an outbound campaign. You upload a file, tell VoiceAIWrapper which column holds what, fix any rows it flags, and the leads are added in the background. Anything extra in your file, such as company name or last purchase, can come along as custom fields your agent can use.
A typical import takes a few minutes, plus a short wait while the leads are added.
Before you start
You'll need:
- An outbound phone campaign that hasn't ended. The Add leads menu only appears on outbound campaigns, and it's greyed out once a campaign has ended.
- A
.csvfile of up to 20 MB and 30,000 rows. Spreadsheet apps (Excel, Google Sheets, Numbers) can all save as CSV. For a bigger list, split it into several files. - A header row. The first row must hold the column names.
- Two columns for each phone number: the Country Code and the Phone Number, kept separate.
How to format the two phone columns
VoiceAIWrapper joins the two into the international format, so 44 and 7700900123 becomes +447700900123. A leading 0 on the phone number, as in the UK's 07700900123, is dropped automatically.
Don't put the country code in the Phone Number column as well. A number such as 14155550123 or +14155550123 passes the checks, but with a Country Code of 1 it becomes +114155550123 and the calls fail. Keep the country code only in its own column.
Step 1: Upload your file
- Open your Pod (an engine or provider connection) and select Campaigns in the sidebar.
- Open the outbound campaign, then open the Leads tab.
- Click Add leads, then choose Add leads via csv. The import dialog opens on Upload a CSV file.
- Not sure how to lay out your file? Click Download Template. You get
csv-template.csvwith sample rows and these columns: First Name, Last Name, Country (Optional: Can be used as custom field), Country Code, Phone Number and Email. - Drag your file onto the upload area, or click it to choose a file. You can upload one file at a time.
- Click Next.
The panel next to the upload area shows the limits (Max file size and Max rows) and a table of each Expected Column, its Expected Type, an Example, and whether it's Required. Only Country Code and Phone Number are required.
Step 2: Map your columns to lead fields
On Map fields, each column in your file gets a row: its name, some sample values, and a Map to Field menu.
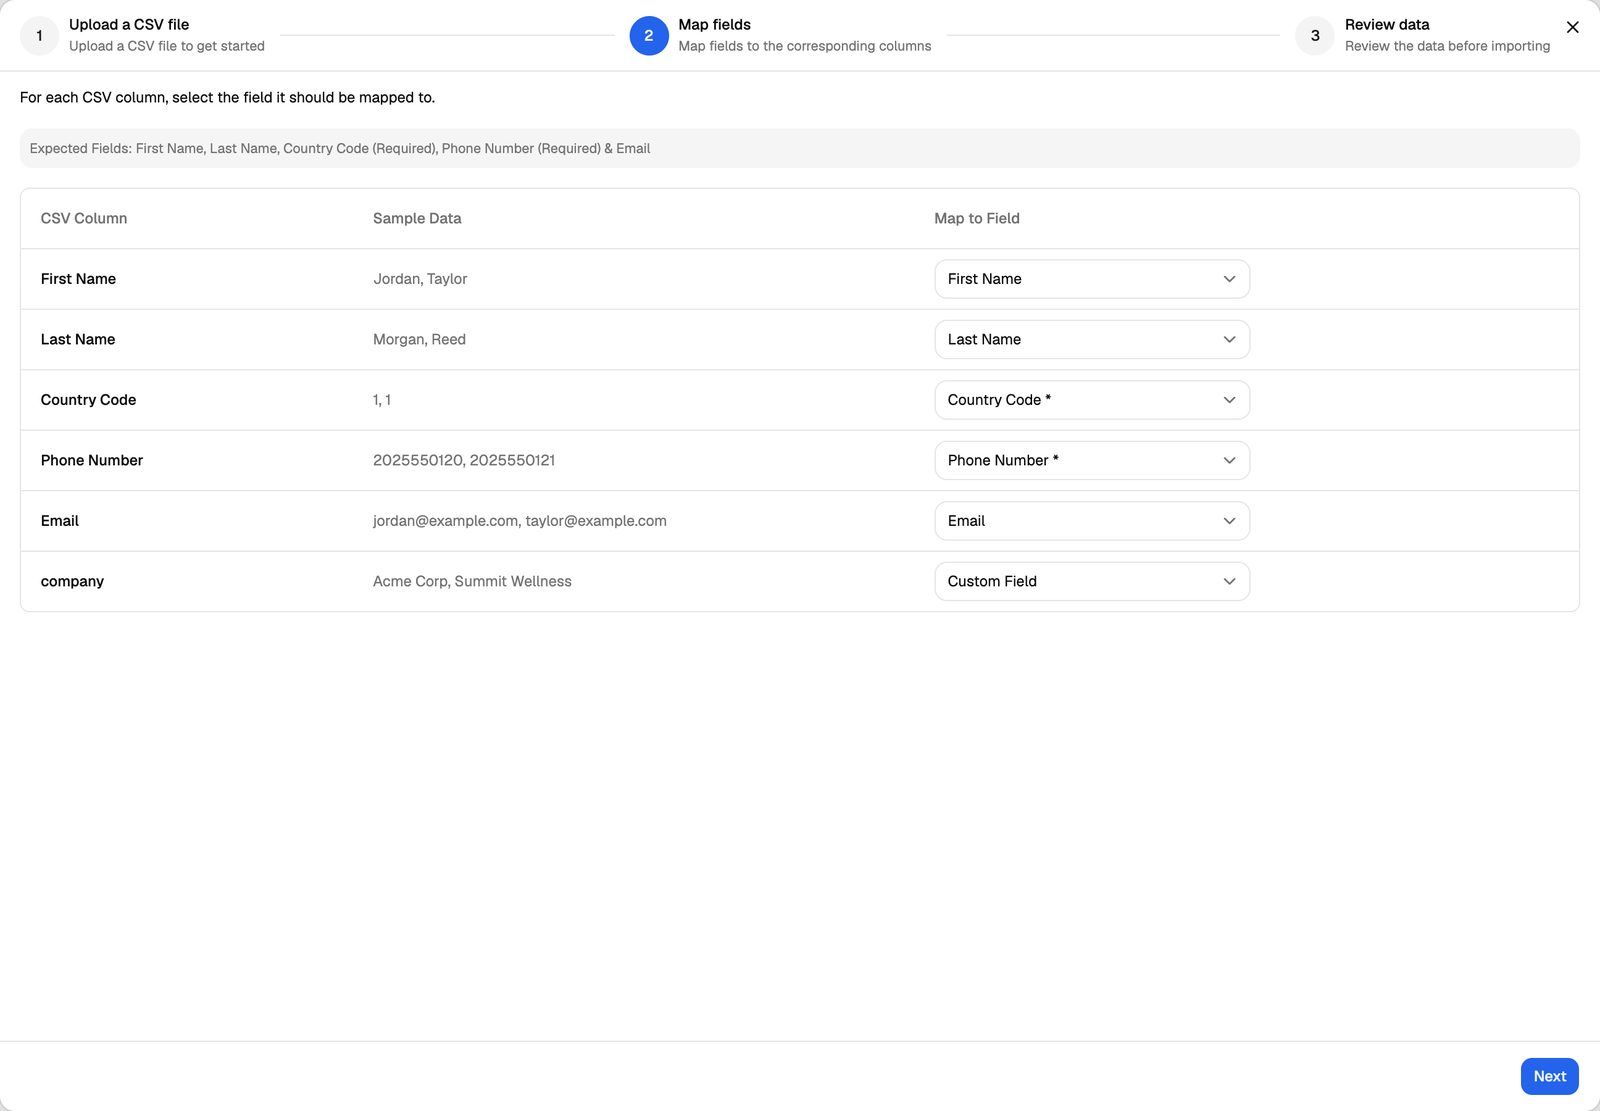
Columns with common names, such as first_name, phone or email, are matched for you. Every other column starts as Custom Field. For each row, choose one of:
Each lead field can be used once. When everything is mapped, click Next.
Custom field keys come straight from your column headers, and custom fields are passed to your agent with each call. Short, clean headers such as company or city are easier to use in your agent's prompt than long ones. In the template, rename Country (Optional: Can be used as custom field) to country before you import, or set it to Ignore Field.
Step 3: Review and fix errors
On Review data, you see every row as it will be imported. Cells with a problem have a red edge on the left. Hover over one to see the error.
- Click a cell to edit its value. The row is checked again when you click away.
- Turn on Only show rows with errors to see only the rows that need attention.
- Select rows and click Delete Selected Rows to drop them from this import. Your file isn't changed.
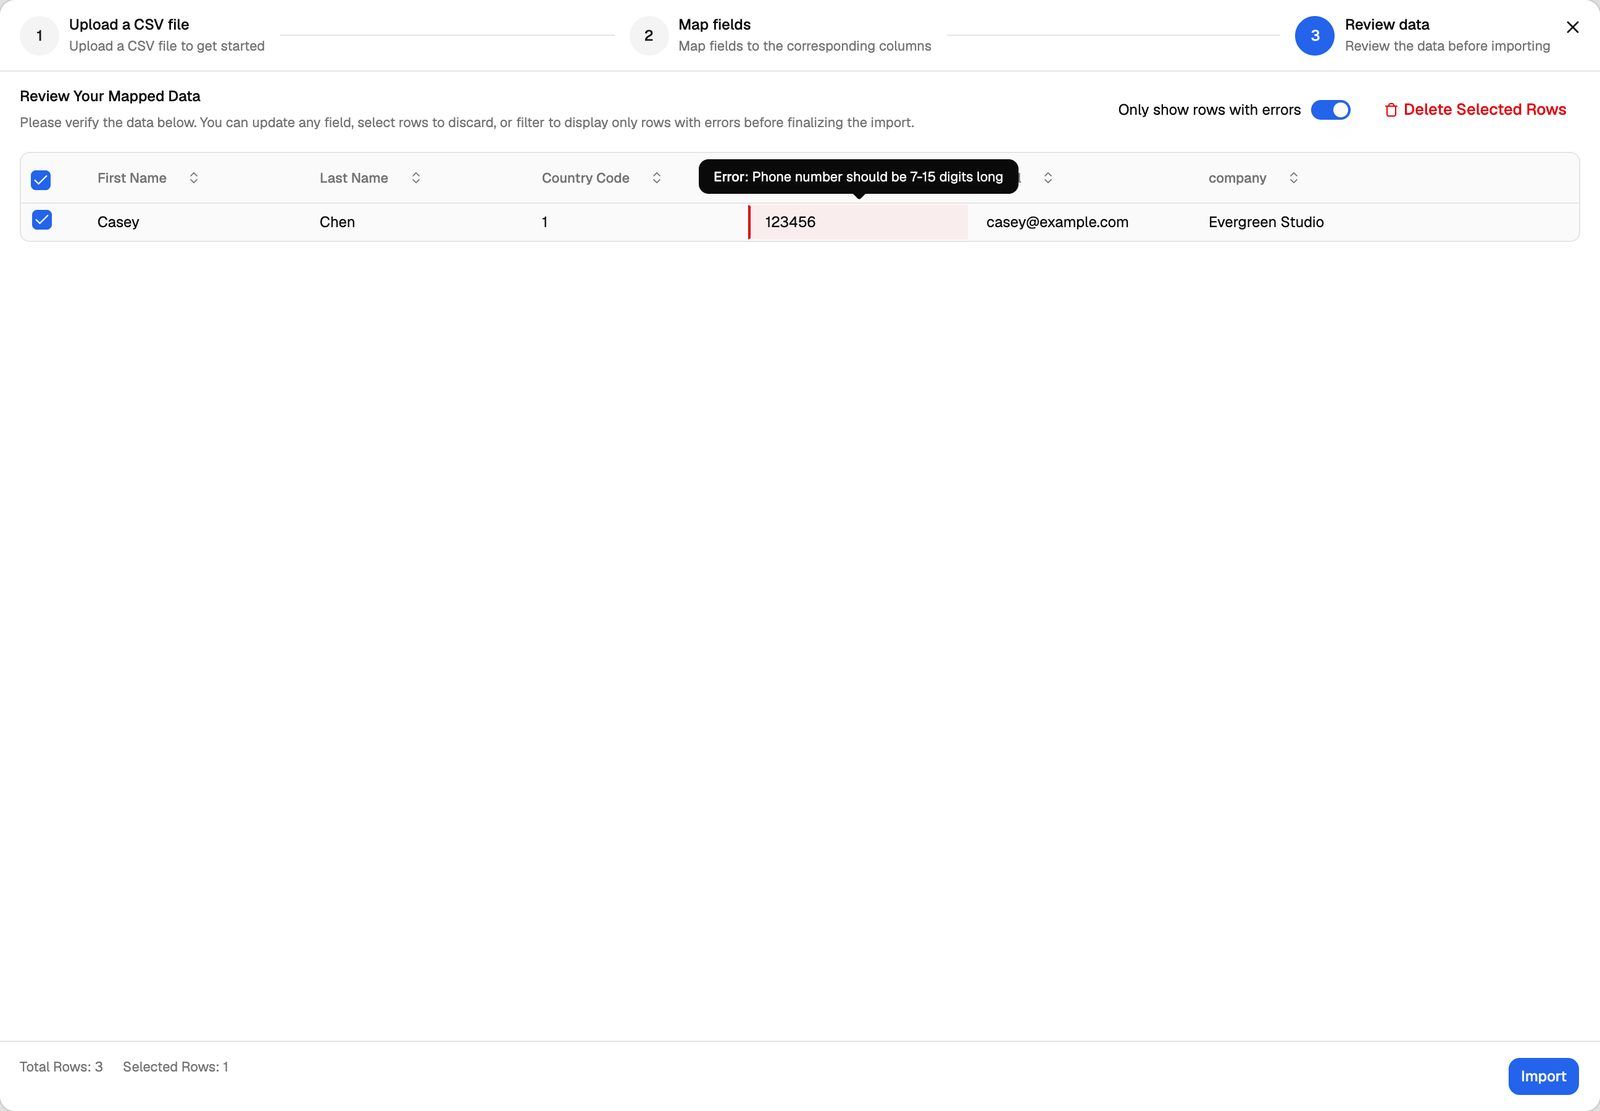
When no errors are left, click Import. The footer shows Total Rows so you can check the count first.
Step 4: Wait for the import to finish
The leads are added in the background. You'll see a message that the leads have been queued for import and may take a few minutes. Refresh the Leads tab after a short wait to see them all.
During the import:
- Numbers already in the campaign are skipped. A phone number can only be in a campaign once, so duplicates are left out without an error.
- Your leads event webhook is notified. If the campaign has a leads event webhook, it receives a Leads Added event for the imported leads, not one event per lead. See Leads Event Webhook.
- Calling can start right away. If the campaign is active and inside its calling window, the agent starts calling the new leads. Calls on a VAW Native Pod use AI credits. Calls on a BYOK Pod (Vapi, Retell AI, ElevenLabs) are billed to your own provider account.
Import into a draft or paused campaign if you want to check the list before any calls go out. Start the campaign when you're ready.
Common import errors
If you click Import while rows still have errors, the import stops and asks you to fix or delete those rows first.
Frequently asked questions
My file is bigger than 20 MB.
My file is bigger than 20 MB.
Remove columns you don't need, or split the file into smaller files and import them one after another. Duplicate numbers across the files are skipped, so overlapping rows are safe.
The import finished but some leads are missing.
The import finished but some leads are missing.
Numbers that were already in the campaign are skipped. Search the Leads tab for a missing number to check. If it's not there, check the row in your file for formatting problems and add it again.
My leads imported but the calls fail.
My leads imported but the calls fail.
The most common cause is a wrong country code, or the country code typed into the Phone Number column as well. Leads whose calls fail with an error are marked Invalid. See Lead Statuses Explained and CSV Import Errors and Invalid Leads.
Can I import leads into an inbound campaign?
Can I import leads into an inbound campaign?
No. Add leads only appears on outbound phone campaigns. Inbound campaigns create their leads from the people who call in.
Related articles
Was this helpful?
Still need help? Share an idea