Guide New Clients with Portal Onboarding
Build a short guided tour of the client portal that each client user sees when they first sign in, in their own language.
Written By voiceaiwrapper
Last updated 26 days ago
Onboarding is a short guided tour of your client portal. The first time a client user signs in, the portal highlights the sidebar pages you chose, one at a time, with a title and a sentence or two you write for each. It helps new clients find their agents, calls and campaigns without a call to your team. Setting it up takes about ten minutes.
Onboarding is available on every plan.
Before you start
- Set the sidebar order first. The page picker lists your sidebar pages in your saved order. See Reorder the Client Portal Sidebar.
- Turn on the languages you want. You can only write steps in languages enabled under Portal Configuration → Localization. See Offer the Portal in Multiple Languages.
- Add custom pages first if you want a step to point at one. See Add Custom Pages and Links to the Portal.
How onboarding works for your clients
- Each client user sees it once. It starts on their first sign-in. When they click Finish or Skip onboarding, it's marked complete and never shows again for that user. If they close or reload the portal halfway through, it starts again from step 1 next time.
- Steps adapt to each client. A step is skipped when its page isn't in that client's sidebar, for example because of their engine, their access permissions or a page hidden from the sidebar. If none of the steps apply to a client, they don't see onboarding at all.
- Steps run in the order you set, not the sidebar order. Each page can be used in one step only.
- It's shown in the client's portal language, falling back to English for any language you haven't written.
- It doesn't run on phones, or when the portal is embedded in another site.
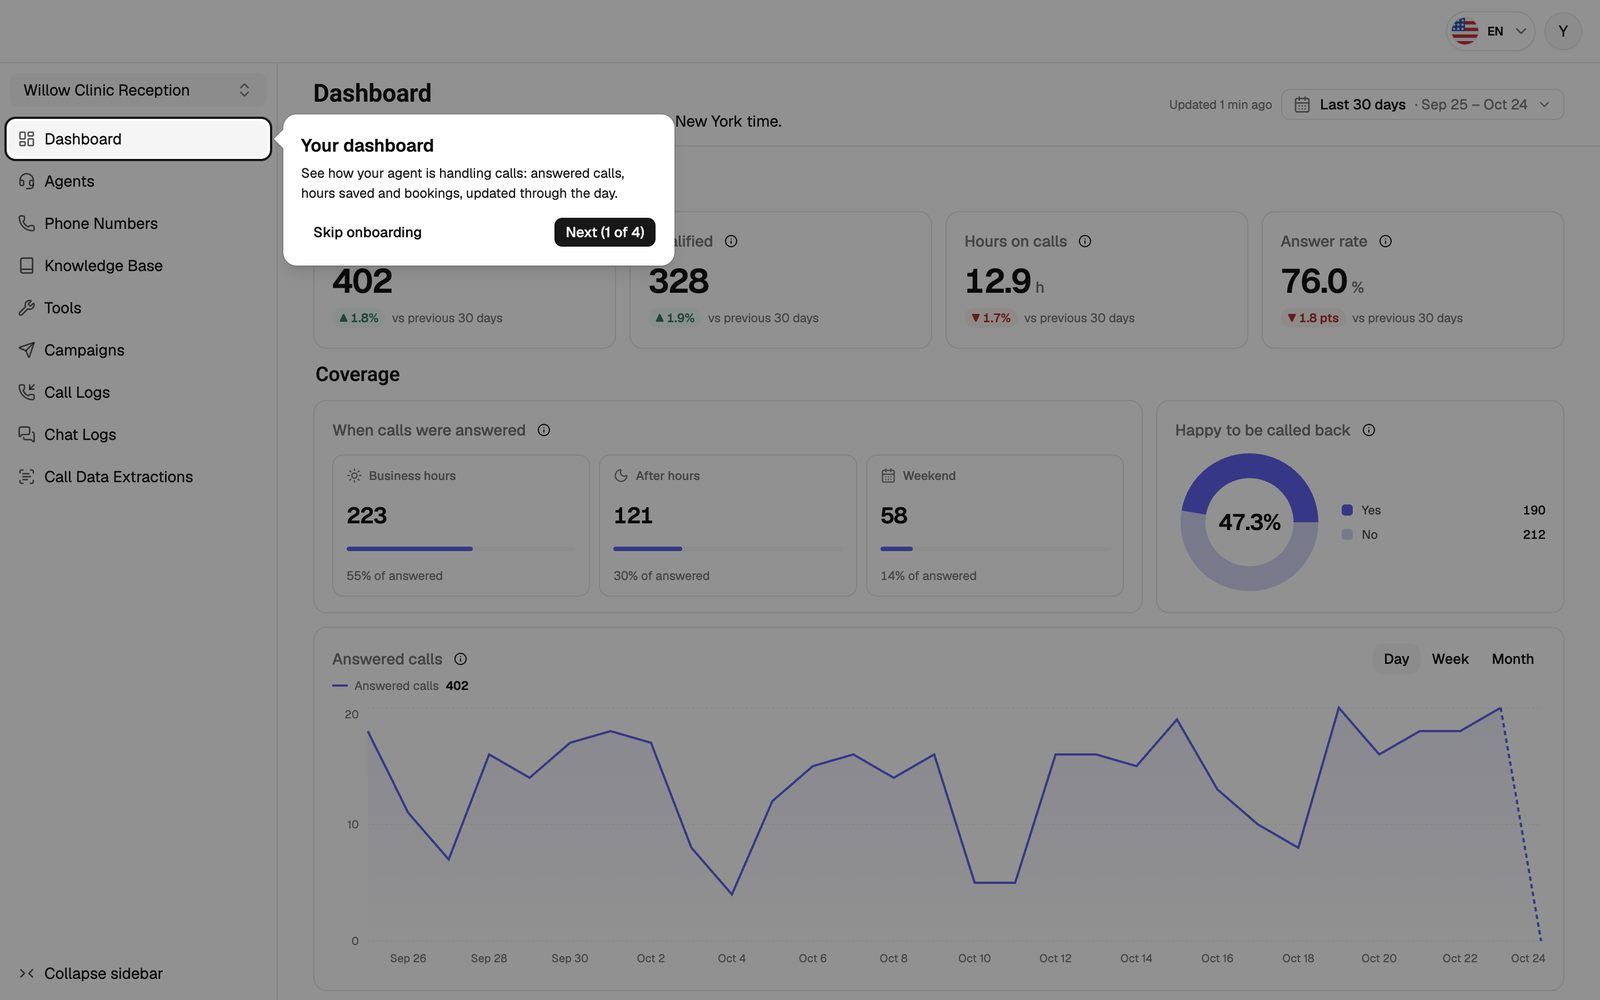
Step 1: Open the onboarding builder
- In the sidebar, open Client Portal → Sidebar.
- Open the Client onboarding tab.
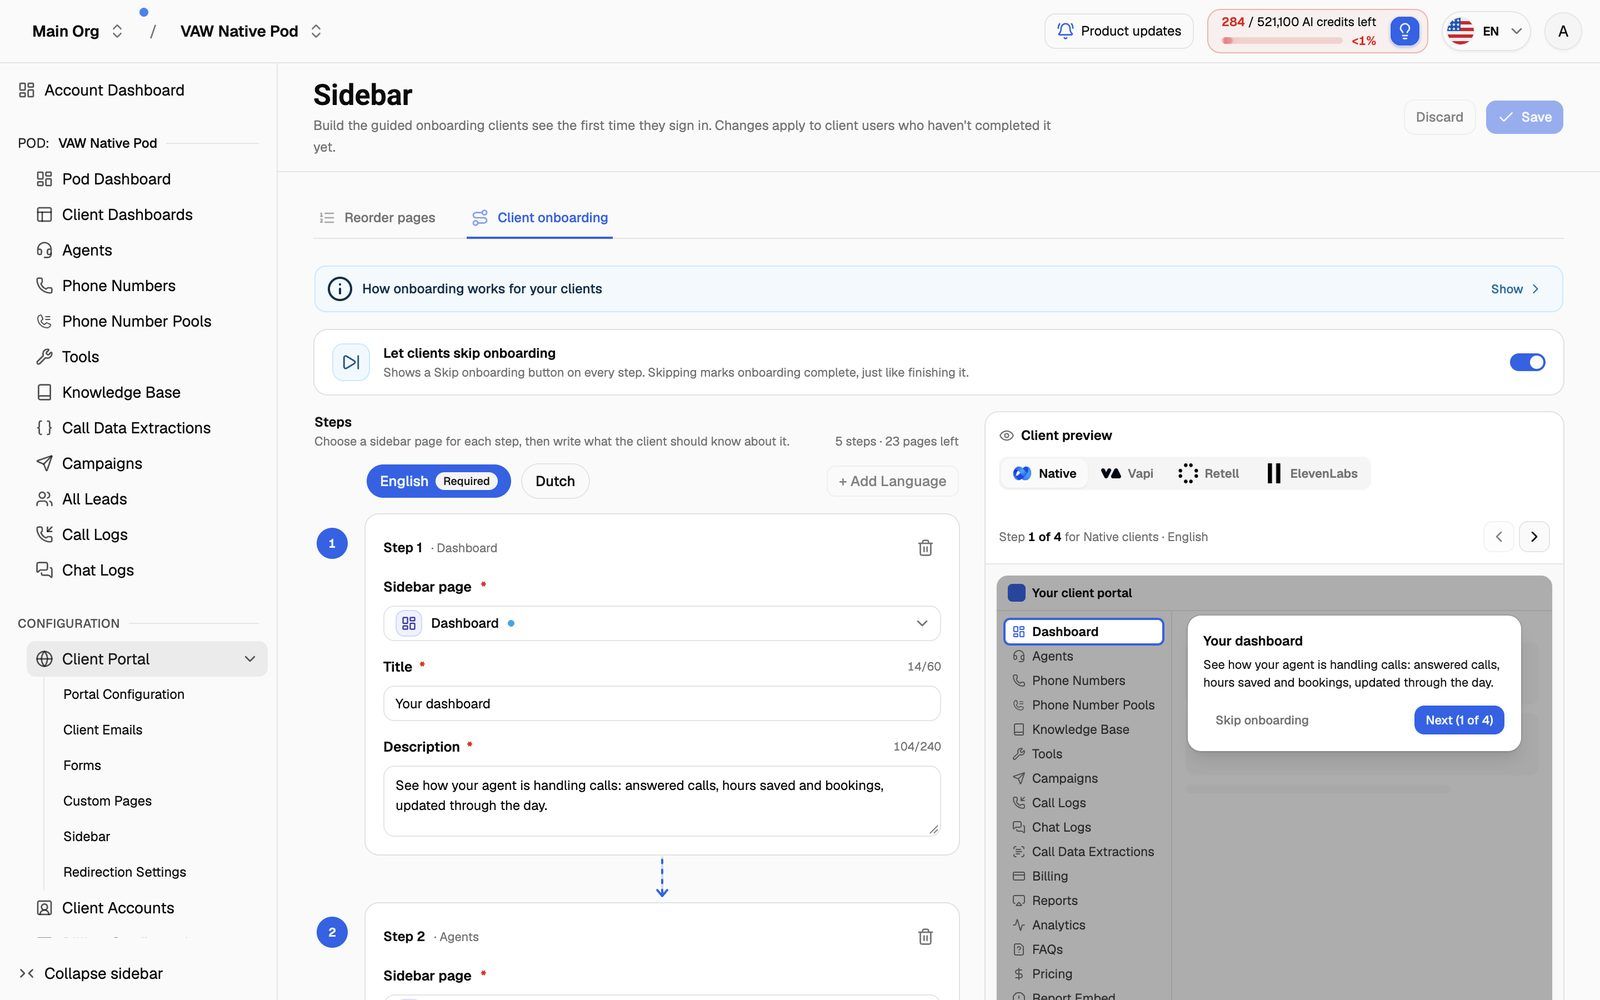
The page has the step builder on the left and a Client preview on the right. The preview needs a wide window (about 1280 pixels); on a smaller screen it's hidden.
Step 2: Decide whether clients can skip
Let clients skip onboarding is on by default. Clients then see a Skip onboarding button on every step, and skipping counts as completing it.
Turn it off if you want every client to go through to the end. There's then no Skip onboarding button, and clients click through until they reach Finish on the last step.
Step 3: Add your steps
For each step:
- Under Sidebar page, choose the page to highlight. Pages already used in another step aren't listed. A blue dot marks a built-in page and an orange dot one of your custom pages.
- Type a Title (up to 60 characters), for example "Your AI agents".
- Type a Description (up to 240 characters) that tells the client what the page is for and what to do there.
A new empty step appears as soon as the current one has a page. You don't need to fill it; empty steps are ignored. To remove a step, click the trash icon on its card. To change a step's page without losing its text, pick another page, or choose No page / Clear selection.
Some pages only exist on one engine. They show a hint such as "Vapi only. Skipped for clients on other providers." Those steps are skipped for clients on other engines, so write each step so the tour still makes sense without them.
Keep it short. Three to five steps on the pages clients use most (agents, campaigns, call logs, billing) works better than a step for every page.
Step 4: Write the steps in your other languages
English is required. Your other enabled languages appear as chips above the steps:
- Click + Add Language and pick a language.
- Select its chip. The step cards now edit that language. The English text is shown under each field as a reference.
- Fill in a title and description for every step.
A badge on the chip counts the steps still missing text. You can't save until every added language has a title and description on every step. To drop a language, select it and click Remove followed by the language name, for example Remove Spanish.
If + Add Language is greyed out, there are no more languages enabled for your portal. Turn them on under Portal Configuration → Localization first.
Step 5: Choose what Finish does
By default, Finish on the last step closes onboarding. To send clients somewhere instead:
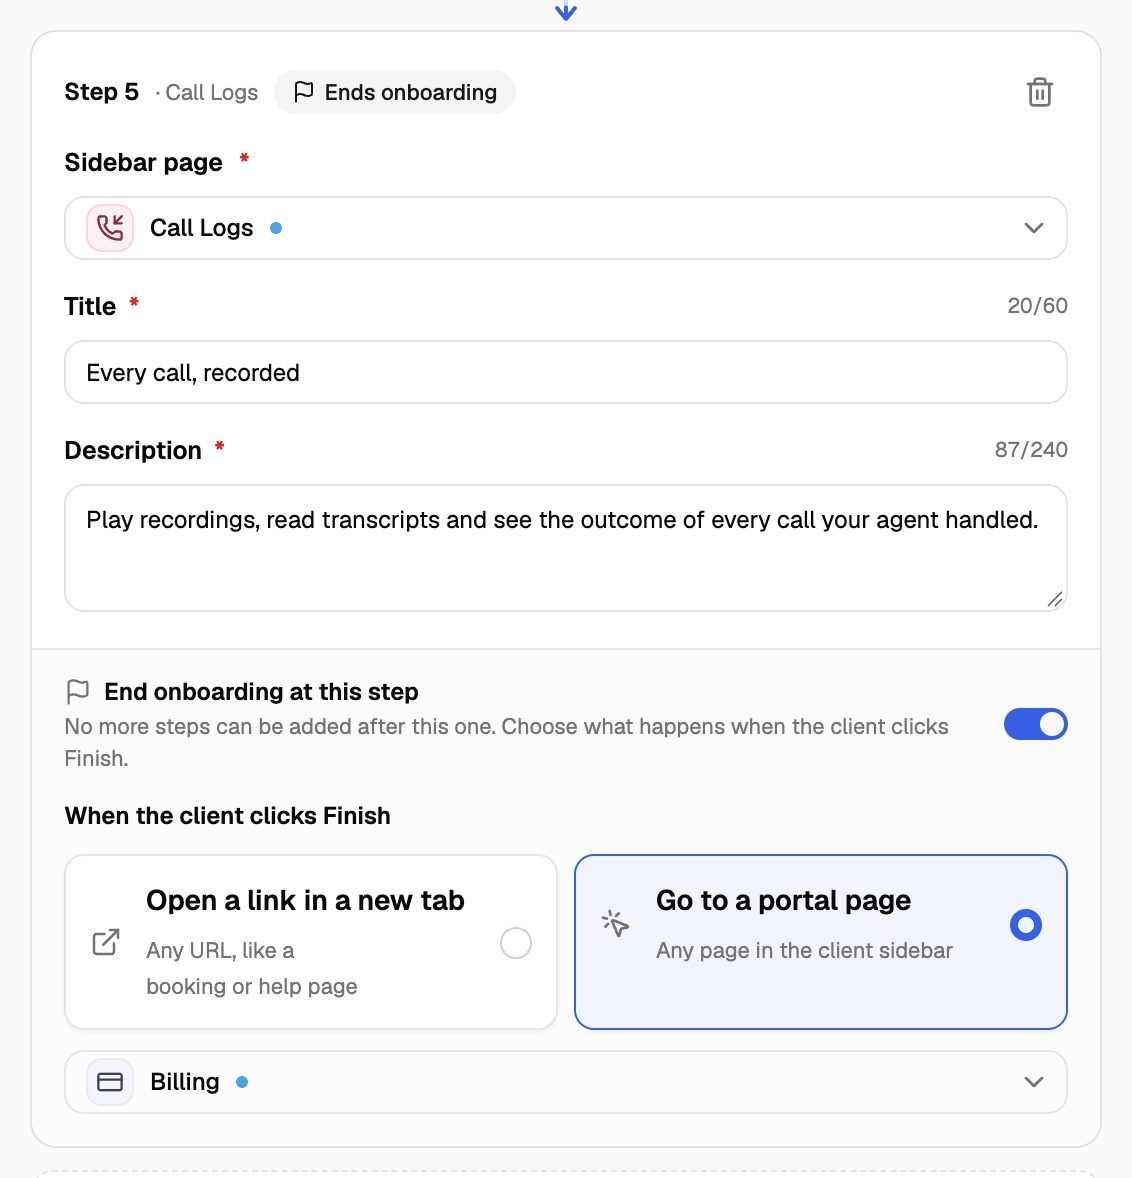
- On the last step, turn on End onboarding at this step. No more steps can be added after it.
- Under When the client clicks Finish, choose:
- Open a link in a new tab: any
https://link, such as a booking page or your help center. - Go to a portal page: any page in the client sidebar. If a client doesn't have that page, for example because it's for another engine, they go to their Dashboard instead.
- Open a link in a new tab: any
To add more steps later, turn End onboarding at this step off again.
Step 6: Check the preview
The Client preview shows a small version of your portal in your saved sidebar order, with the tooltip next to the highlighted page. Use the arrows above it to step through.
- Engine tabs (Native, Vapi, Retell, ElevenLabs) show what clients on each engine will see. Only engines you have a Pod (an engine or provider connection) for are shown.
- A callout under the preview lists any steps that are skipped for the selected engine.
- The last line says what Finish will do.
The buttons in the preview tooltip can't be clicked; they show what clients will see.
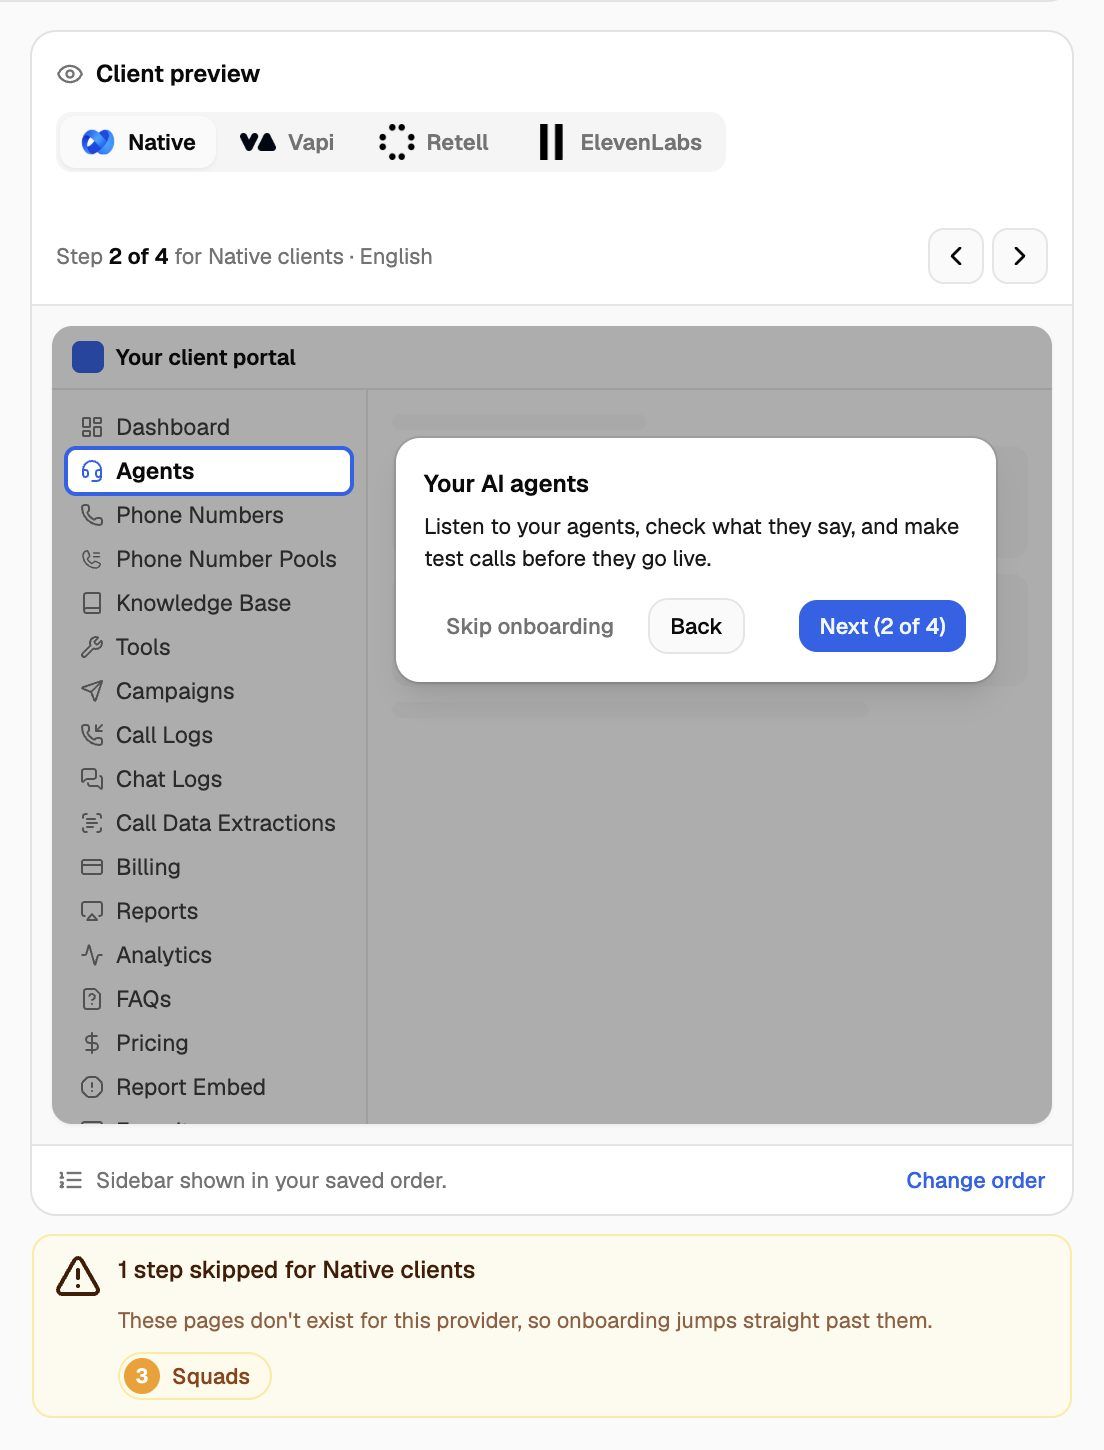
The preview can't know each client's access permissions. A step can still be skipped for a client whose permissions hide its page.
Step 7: Save
Click Save at the top of the page. You'll see "Onboarding saved. Client users who haven't completed it will see this version on their next sign-in." Discard throws away your unsaved changes.
To turn onboarding off, remove every step and save. You'll see "Onboarding is off. Clients won't see onboarding until you add a step."
Clients who have already finished or skipped onboarding won't see your changes. There's no way to show it to them again.
Test it as a client
Logging in as a client from your agency account never shows onboarding and never marks it complete, so you can preview a client's portal safely. To see the tour itself, sign in to the portal as a new client user (for example, a test user you add to a test client). See Add and Manage Client Users.
Troubleshooting
A client says they never saw onboarding.
A client says they never saw onboarding.
Check these, in order:
- Did you save at least one step? An empty onboarding is off.
- Is the client on a phone, or using the portal embedded in another site? Onboarding doesn't run there.
- Do any of your steps apply to them? If every step's page is missing from their sidebar (because of their engine, permissions or hidden pages), onboarding doesn't start.
- Had they already finished or skipped it? It only shows once per client user.
- Were they already signed in when you saved? They'll see it after they sign in again.
It says "Onboarding not saved. Fix the highlighted steps and try again."
It says "Onboarding not saved. Fix the highlighted steps and try again."
A step is missing something. Look for the red message on the step cards: usually a missing title or description (in English or another language), text over the limit, or a step with no page. Check the language chips too; a badge means that language still has missing text.
A step says "This page no longer exists."
A step says "This page no longer exists."
The page was deleted, usually a custom page. Choose another page for the step, or remove it.
Can I reset onboarding so clients see it again?
Can I reset onboarding so clients see it again?
No. Once a client user has finished or skipped it, it won't show for them again. New client users will see your latest version.
Related articles
Was this helpful?
Still need help? Share an idea